Blogs
7 Low Carb High Protein Breakfast Ideas for Busy Mornings

7 Low Carb High Protein Breakfast Ideas for Busy Mornings

Honestly, I used to be a cereal-in-a-bowl kind of girl. Quick, easy, but I’d

Honestly, I used to be a cereal-in-a-bowl kind of girl. Quick, easy, but I’d be starving and shaky by 10 AM. It was a total blood sugar roller coaster. Everything changed when my friend Sarah dared me to try a “protein-forward” week. No toast, no muffins—just real, savory fuel. I remember sitting at my chipped wooden kitchen table that first Tuesday, biting into a cheesy egg muffin, and realizing I didn’t need the bagel. I felt sharp. I felt full. Since then, I’ve perfected these recipes to make sure they aren’t just “diet food,” but stuff you actually want to eat.

Buffalo Chicken Breakfast Scramble

Buffalo Chicken Breakfast Scramble

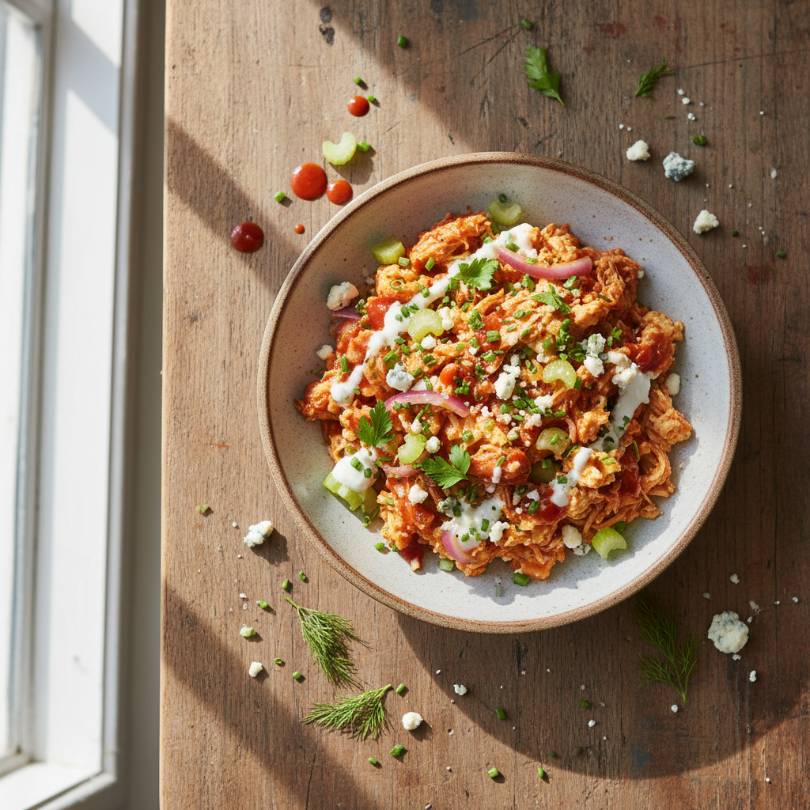
Who says buffalo sauce is just for game day? This is my absolute favorite way to use up leftover rotisserie chicken from the night before. It’s spicy, creamy, and wakes up your taste buds better than a double espresso. I love how the blue cheese crumbles melt just enough to get earthy and funky against the heat of the sauce.

Ingredients

3 large eggs — whisked until frothy
1/2 cup rotisserie chicken — shredded or chopped small
1 tablespoon Frank’s RedHot — or your favorite buffalo sauce
1 tablespoon unsalted butter — for the pan
2 tablespoons blue cheese crumbles — or feta if you aren’t a blue cheese fan
1 green onion — thinly sliced for garnish
1/4 avocado — sliced on the side

Instructions

1. Heat a non-stick skillet over medium-low heat and melt the butter until it starts to foam.
2. Toss the shredded chicken into the pan for about 2 minutes just to get it warm and slightly crispy.
3. Pour the whisked eggs over the chicken. Let them sit for 30 seconds before gently moving them with a spatula.
4. Drizzle the buffalo sauce over the eggs while they are still slightly wet.
5. Fold in the cheese crumbles right before you take the pan off the heat so they stay chunky but soft.
6. Top with green onions and serve with avocado to cool down the spice.

Tips

Keep it low — Don’t crank the heat or your eggs will get rubbery and dry. Low and slow is the secret to a soft scramble.
Sauce choice — Make sure your buffalo sauce doesn’t have hidden sugars; Frank’s is usually the safest bet for keto.

I’m obsessed with this because it feels “naughty” for breakfast. It totally cures that craving for wings without the heavy breading. It’s punchy and bold. If you’re tired of boring eggs, this is the one that will change your mind.

📋 Recipe Card

Buffalo Chicken Breakfast Scramble

⏱️ Prep: 5 mins🍳 Cook: 7 mins👥 Serves: 1🔥 Calories: 380
⏱️ Total Time: 12 mins

🥗 Ingredients

  • 3 large eggs
  • 1/2 cup rotisserie chicken, shredded
  • 1 tbsp Frank’s RedHot sauce
  • 1 tbsp unsalted butter
  • 2 tbsp blue cheese crumbles
  • 1 green onion, sliced
  • 1/4 avocado, sliced

📋 Instructions

  1. 1Melt butter in a non-stick skillet over medium-low heat.
  2. 2Sauté chicken for 2 minutes until warm.
  3. 3Add whisked eggs and cook gently, stirring occasionally.
  4. 4Drizzle buffalo sauce over the eggs while still slightly wet.
  5. 5Fold in blue cheese crumbs and garnish with green onions and avocado.

Pesto & Prosciutto Baked Egg Cups

Pesto & Prosciutto Baked Egg Cups

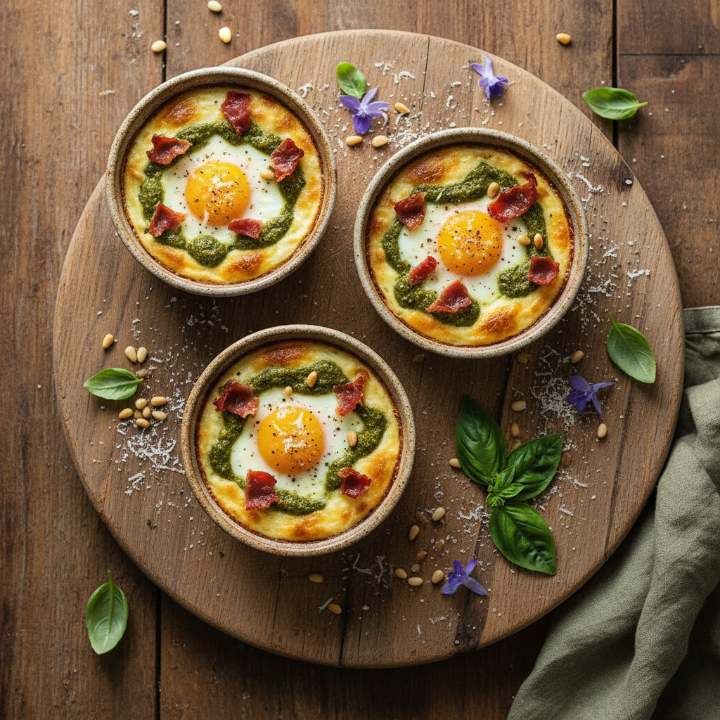
These look like they belong in a fancy brunch cafe, but they take zero effort. You use the prosciutto as a “liner” for a muffin tin, and it crisps up like a salty, delicate shell. The pesto adds a hit of garlic and basil that makes the whole kitchen smell like a summer garden in Italy.

Ingredients

6 slices prosciutto — thin enough to be pliable
6 large eggs — room temperature if possible
3 tablespoons basil pesto — store-bought is fine, just check for clean oils
1/2 cup cherry tomatoes — halved
2 tablespoons freshly grated parmesan — for a salty crust
Salt and pepper — go light on the salt, the meat is salty!

Instructions

1. Preheat your oven to 375°F (190°C) and lightly grease 6 holes of a standard muffin tin.
2. Line each muffin cup with a slice of prosciutto, pressing it against the bottom and sides to create a little “nest.”
3. Spoon half a tablespoon of pesto into the bottom of each prosciutto cup.
4. Crack one egg into each cup, being careful not to break the yolk.
5. Push two cherry tomato halves into the whites of each egg and sprinkle the parmesan on top.
6. Bake for 12-15 minutes. 12 minutes gives you a runny yolk, 15 minutes is fully set.

Tips

Paper towels are key — If your pesto is very oily, dab the top after baking to remove any excess grease.
Cooling — Let them sit for 3 minutes before removing from the tin so the prosciutto “cup” firms up.

It’s the texture for me. The bottom of the prosciutto gets almost chewy while the top edges get shatter-crisp. I usually make a double batch on Sundays. They reheat surprisingly well in the air fryer for about 2 minutes.

📋 Recipe Card

Pesto & Prosciutto Baked Egg Cups

⏱️ Prep: 10 mins🍳 Cook: 15 mins👥 Serves: 3🔥 Calories: 240
⏱️ Total Time: 25 mins

🥗 Ingredients

  • 6 slices prosciutto
  • 6 large eggs
  • 3 tbsp basil pesto
  • 1/2 cup cherry tomatoes, halved
  • 2 tbsp grated parmesan cheese
  • Pinch of salt and pepper

📋 Instructions

  1. 1Preheat oven to 375°F and grease a 6-cup muffin tin.
  2. 2Line each cup with one slice of prosciutto to form a nest.
  3. 3Add 1/2 tablespoon of pesto to the bottom of each nest.
  4. 4Crack one egg into each cup and top with tomato halves and parmesan.
  5. 5Bake for 12-15 minutes until egg whites are set.

Cottage Cheese & Hemp Heart “Power Bowl”

Cottage Cheese & Hemp Heart

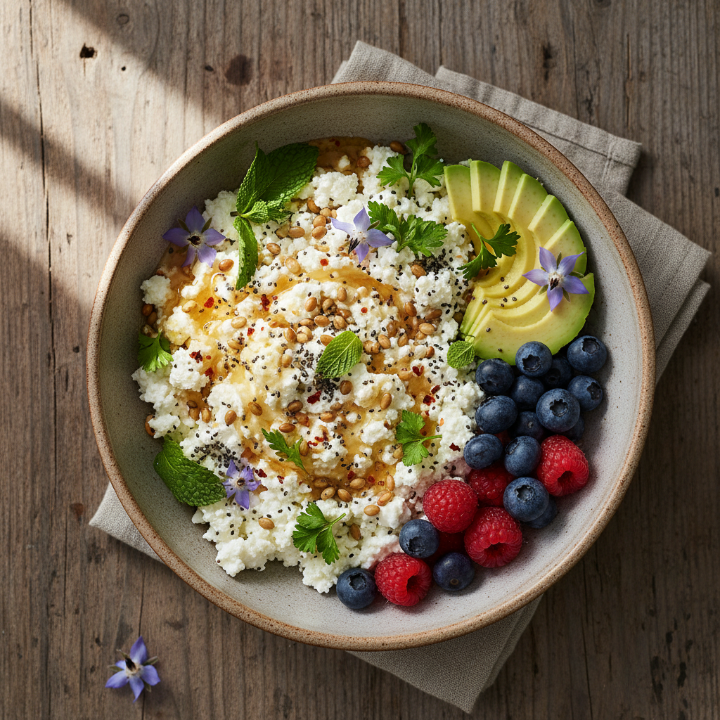
If you want a cold breakfast that isn’t yogurt, this is your new best friend. Cottage cheese is a protein powerhouse, and when you load it with seeds and a hint of sweetness, it’s basically a deconstructed cheesecake. It’s thick, creamy, and keeps you full for hours.

Ingredients

1 cup full-fat cottage cheese — I like the 4% milkfat small curd version
2 tablespoons hemp hearts — for omega fats and protein
1 tablespoon chia seeds — for crunch and fiber
1/4 cup blackberries — low glycemic and beautiful
5-6 drops liquid stevia or monk fruit — optional for sweetness
1/4 teaspoon cinnamon — because it makes everything taste like a treat

Instructions

1. Scoop the cottage cheese into a bowl. I use my heavy ceramic cereal bowl for this—it feels more substantial.
2. Stir in your sweetener of choice and the cinnamon until well combined.
3. Layer the hemp hearts and chia seeds in a ring around the edge.
4. Place the blackberries in the center.
5. Eat immediately or let it sit for 10 minutes so the chia seeds can soften slightly.

Tips

Texture hack — If you hate the “curds” of cottage cheese, throw the whole container in a blender first. It becomes a smooth, velvety cream.
Nutty finish — Add three or four crushed walnuts for an extra hit of crunch.

This is my “I have no time” breakfast. It’s faster than making toast. I used to be a cottage cheese skeptic, but the hemp hearts add this nutty, earthy flavor that balances the tanginess perfectly. It’s light but mighty.

📋 Recipe Card

Cottage Cheese & Hemp Heart Power Bowl

⏱️ Prep: 5 mins🍳 Cook: 0 mins👥 Serves: 1🔥 Calories: 310
⏱️ Total Time: 5 mins

🥗 Ingredients

  • 1 cup full-fat cottage cheese
  • 2 tbsp hemp hearts
  • 1 tbsp chia seeds
  • 1/4 cup blackberries
  • 5 drops liquid stevia (optional)
  • 1/4 tsp cinnamon

📋 Instructions

  1. 1Place cottage cheese in a bowl.
  2. 2Stir in the sweetener and cinnamon.
  3. 3Top with hemp hearts and chia seeds.
  4. 4Add blackberries on top and serve chilled.

Savory Steak & Radish Breakfast Hash

Savory Steak & Radish Breakfast Hash

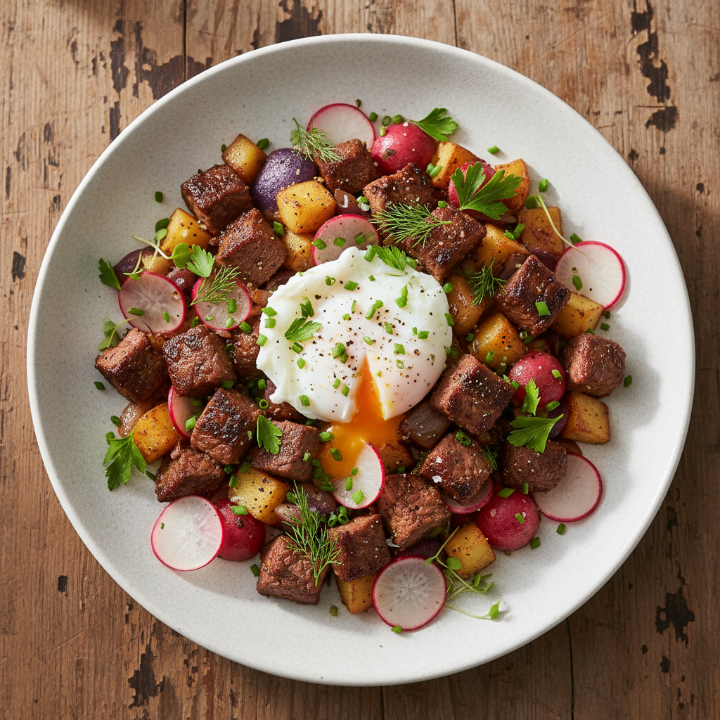
Potatoes are usually the star of a hash, but we’re swapping them for radishes. Don’t wrinkle your nose! When you sauté radishes, they lose that peppery bite and become mellow, soft, and remarkably like a red potato. Paired with steak, it’s the ultimate “man-breakfast” that leaves you feeling like a powerhouse.

Ingredients

6 oz flank steak or ribeye — cut into small 1/2 inch cubes
1 bunch red radishes — trimmed and quartered
1/2 small onion — diced
1 clove garlic — smashed and minced
1 tablespoon beef tallow or avocado oil — for a high smoke point
Handful of fresh parsley — chopped for brightness
Red pepper flakes — for a little kick

Instructions

1. Heat your skillet over medium-high heat with the oil until it’s shimmer-hot.
2. Sear the steak cubes quickly for 2-3 minutes. You want a brown crust but a pink center. Remove steak from the pan and set aside.
3. Add the radishes and onions to the same pan (don’t wipe it out!). Cook for 8-10 minutes, stirring occasionally.
4. Wait until the radishes are golden-brown and fork-tender.
5. Stir the steak and garlic back in for 1 minute just to marry the flavors.
6. Finish with a shower of parsley and the red pepper flakes.

Tips

Don’t overcrowd — If the pan is too full, the radishes will steam instead of browning. Use a big skillet.
Season well — Radishes need a good hit of salt to really bring out that “potato” vibe.

My husband thought I was tricking him with the radishes. He genuinely thought they were baby potatoes. It’s hearty, salty, and feels incredibly decadent for a random Wednesday morning. If you have some leftover steak, this takes 10 minutes tops.

📋 Recipe Card

Savory Steak & Radish Breakfast Hash

⏱️ Prep: 10 mins🍳 Cook: 15 mins👥 Serves: 2🔥 Calories: 420
⏱️ Total Time: 25 mins

🥗 Ingredients

  • 6 oz flank steak, cubed
  • 1 bunch red radishes, quartered
  • 1/2 small onion, diced
  • 1 clove garlic, minced
  • 1 tbsp beef tallow or oil
  • Fresh parsley and red pepper flakes

📋 Instructions

  1. 1Sear steak cubes in a hot skillet with oil for 3 minutes; remove and set aside.
  2. 2Add radishes and onions to the same skillet.
  3. 3Sauté radishes for 8-10 minutes until golden and tender.
  4. 4Stir steak and garlic back in for 1 minute.
  5. 5Garnish with parsley and pepper flakes.

Smoked Salmon & Chive Omelet

Smoked Salmon & Chive Omelet

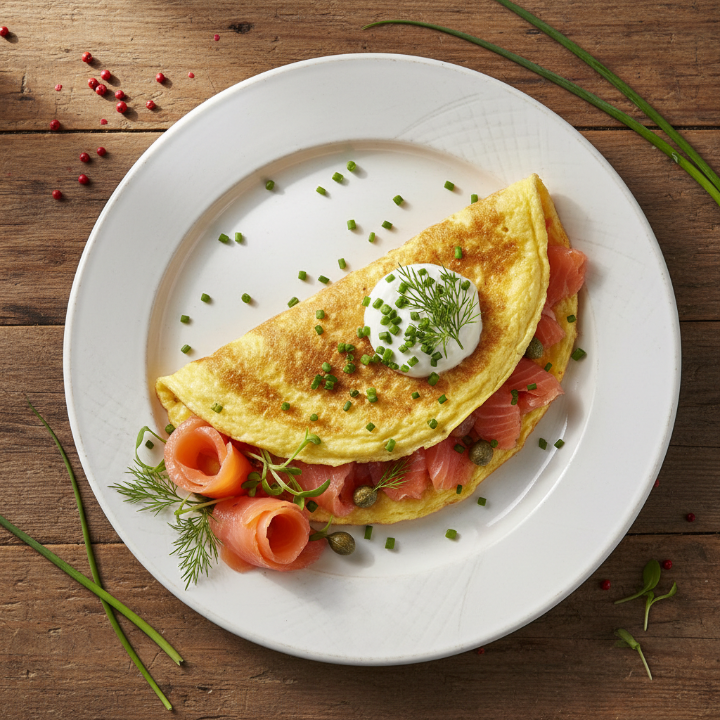
This is pure elegance. It’s the kind of breakfast you make when you want to feel like you’re on vacation in a high-end hotel. The smokiness of the fish against the silky, buttery eggs is a match made in heaven.

Ingredients

2 large eggs — beaten with a splash of heavy cream
2 oz smoked salmon — lox style, torn into pieces
1 tablespoon cream cheese — softened and cubed
1 teaspoon fresh chives — snipped into tiny bits
1/2 tablespoon butter — for the pan
Black pepper — to taste

Instructions

1. Melt the butter in an 8-inch skillet over medium heat.
2. Pour in the egg mixture. Use a spatula to push the cooked edges toward the center, tilting the pan so the raw egg fills the gaps.
3. Layer the smoked salmon and cream cheese cubes on one half of the omelet once the top is mostly set but still looks “shiny.”
4. Fold the other half over. Cover the pan with a lid for 30 seconds to help the cream cheese get melty.
5. Slide the omelet onto a plate and garnish heavily with chives.

Tips

No salt needed — Smoked salmon is naturally very salty, so skip the salt in the eggs.
Heavy cream — Adding just a teaspoon of heavy cream to the eggs makes them much fluffier.

I make this every time I feel a bit run down. The healthy fats from the salmon and the luxury of the cream cheese always cheer me up. It’s light on the stomach but heavy on the nutrients.

📋 Recipe Card

Smoked Salmon & Chive Omelet

⏱️ Prep: 5 mins🍳 Cook: 5 mins👥 Serves: 1🔥 Calories: 350
⏱️ Total Time: 10 mins

🥗 Ingredients

  • 2 large eggs
  • 1 tsp heavy cream
  • 2 oz smoked salmon, torn
  • 1 tbsp cream cheese, cubed
  • 1 tsp fresh chives, snipped
  • 1/2 tbsp butter

📋 Instructions

  1. 1Whisk eggs and cream together.
  2. 2Melt butter in an 8-inch skillet over medium heat.
  3. 3Pour eggs in and cook until nearly set.
  4. 4Place salmon and cream cheese on one half; fold the other half over.
  5. 5Cook for 30 more seconds and serve topped with chives.

Sausage & Spinach Egg Bake

Sausage & Spinach Egg Bake

This is the king of meal prep. I make this in a big casserole dish on Sunday evening, and I have breakfast ready for the next four days. It’s dense, packed with greens, and savory as can be.

Ingredients

1 lb ground breakfast sausage — no sugar added
10 large eggs — whisked
2 cups fresh baby spinach — roughly chopped
1 cup shredded cheddar cheese — sharp is best
1/4 cup heavy cream — for richness
1/2 teaspoon onion powder — for depth

Instructions

1. Brown the sausage in a skillet until fully cooked. Drain the excess fat.
2. Preheat oven to 350°F (175°C) and grease a 9×13 baking dish.
3. Scatter the cooked sausage and chopped spinach evenly across the bottom of the dish.
4. Whisk the eggs, heavy cream, onion powder, and half the cheese in a large bowl.
5. Pour the egg mixture over the sausage and spinach. Sprinkle the remaining cheese on top.
6. Bake for 25-30 minutes until the center is set and the top is slightly golden.

Tips

Dry the spinach — If your spinach is wet from washing, squeeze it dry in a paper towel so your egg bake isn’t watery.
Flavor swap — Use spicy chorizo instead of breakfast sausage for a Mexican-inspired twist.

I call this my “life-saver.” When I’m rushing out the door, a square of this cold or zapped in the microwave for 45 seconds is perfection. It’s reliable, filling, and tastes even better the second day.

📋 Recipe Card

Sausage & Spinach Egg Bake

⏱️ Prep: 15 mins🍳 Cook: 30 mins👥 Serves: 8🔥 Calories: 320
⏱️ Total Time: 45 mins

🥗 Ingredients

  • 1 lb ground breakfast sausage
  • 10 large eggs
  • 2 cups baby spinach, chopped
  • 1 cup shredded cheddar cheese
  • 1/4 cup heavy cream
  • 1/2 tsp onion powder

📋 Instructions

  1. 1Preheat oven to 350°F and brown sausage in a skillet; drain fat.
  2. 2Grease a 9×13 baking dish and spread sausage and spinach inside.
  3. 3Whisk eggs, cream, onion powder, and half the cheese.
  4. 4Pour egg mixture over the sausage.
  5. 5Top with remaining cheese and bake for 25-30 minutes.

Peanut Butter & Flax Seed Mug Cake

Peanut Butter & Flax Seed Mug Cake

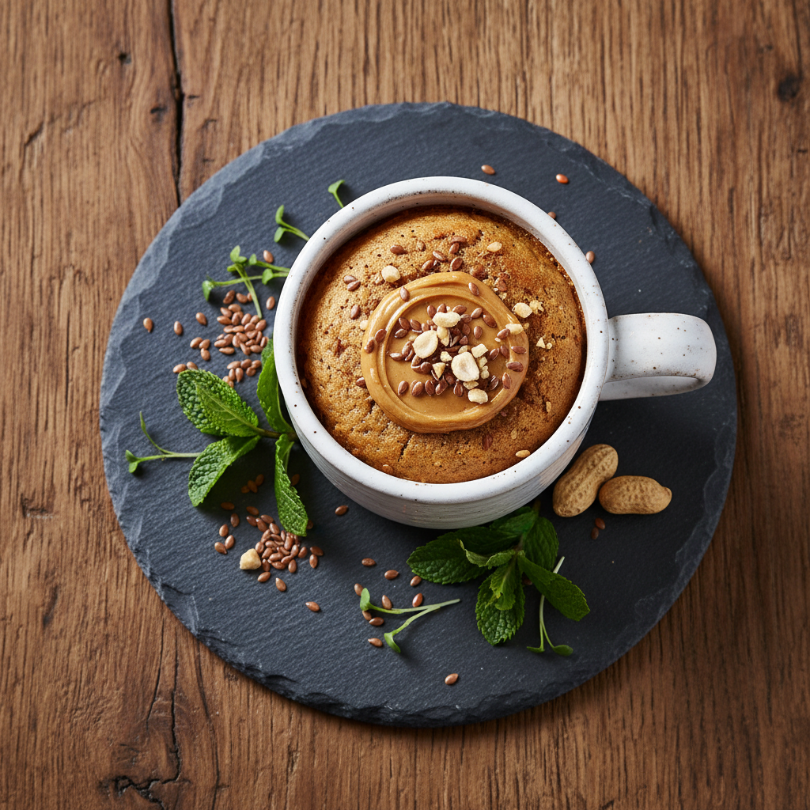
Sometimes you just want something warm and “cakey” without the carb coma. This mug cake takes 90 seconds in the microwave and tastes like a giant peanut butter cookie. It’s rich in fiber thanks to the flax.

Ingredients

2 tablespoons creamy peanut butter — sugar free
1 tablespoon ground flaxseed meal — for texture and fiber
1 large egg — provides the lift
1/2 teaspoon baking powder — makes it fluffy
1 tablespoon erythritol or monk fruit sweetener — to taste
1/2 teaspoon vanilla extract — for that bakery scent

Instructions

1. Combine all ingredients in a large microwave-safe mug.
2. Stir vigorously with a fork until nobody can see any streaks of egg. The batter should be thick and smooth.
3. Microwave on high for 60 to 90 seconds. It will puff up significantly!
4. Test the top. It should be firm but springy to the touch.
5. Let it sit for 1 minute before eating—it’s molten hot inside!

Tips

Mug size — Use a larger mug than you think you need. This cake grows like crazy while cooking.
Toppings — A smear of butter or a few sugar-free chocolate chips on top makes this feel like dessert for breakfast.

This is my “emergency” breakfast. When the fridge is empty and I’m about to reach for a sugary granola bar, I make this instead. It’s weirdly satisfying and hits that “bread” craving perfectly.

📋 Recipe Card

Peanut Butter & Flax Seed Mug Cake

⏱️ Prep: 2 mins🍳 Cook: 1.5 mins👥 Serves: 1🔥 Calories: 290
⏱️ Total Time: 3.5 mins

🥗 Ingredients

  • 2 tbsp creamy peanut butter
  • 1 tbsp ground flaxseed meal
  • 1 large egg
  • 1/2 tsp baking powder
  • 1 tbsp monk fruit sweetener
  • 1/2 tsp vanilla extract

📋 Instructions

  1. 1Mix all ingredients in a large microwave-safe mug with a fork.
  2. 2Ensure the egg is fully incorporated into the peanut butter.
  3. 3Microwave on high for 60-90 seconds until firm.
  4. 4Let cool for 1 minute before eating.

General Tips & Tricks

When you’re doing high protein and low carb, prep is your best friend. Always have a carton of eggs and some cooked protein (like sausage or chicken) ready to go. Don’t be afraid of healthy fats like avocado or butter; they are what actually signal to your brain that you’re full. Also, hydration matters—drink a big glass of water before you eat.

Conclusion

Breakfast doesn’t have to be a sugar bomb to be “good.” These recipes prove that you can have variety, flavor, and serious protein without the heavy carbs. Try the buffalo scramble first—trust me on that one! Happy cooking.

5 Low Carb High Protein Breakfast Ideas for All-Day Energy

5 Low Carb High Protein Breakfast Ideas for All-Day Energy

I used to be the person who grabbed a granola bar and wondered why

I used to be the person who grabbed a granola bar and wondered why I was shaky and starving by 10 AM. It was frustrating. My energy would dip right when I needed to be “on” for work or my kids. Then I switched to high protein, lower carb starts, and honestly? It changed everything. No more “hanger” at my desk.

This collection is for anyone who needs to feel fueled without the sugar crash. We’re talking real food that actually tastes like a treat, not cardboard. These are my go-to morning wins that I make on repeat in my own messy kitchen.

Zucchini and Prosciutto Egg Muffins

5 Low Carb High Protein Breakfast Ideas for All-Day Energy

Think of these as your portable “fancy brunch.” I first made these when I had a leftover zucchini from the garden that was staring me down. They’re savory, slightly salty from the meat, and perfect for when you’re running out the door with a coffee in the other hand.

Ingredients
* 6 large eggs — beaten until frothy
* 1 medium zucchini — grated and squeezed dry with a towel (don’t skip the squeeze!)
* 4 slices prosciutto — chopped into small ribbons
* 1/2 cup sharp cheddar — shredded
* 1/4 tsp black pepper — freshly cracked
* 1 pinch red pepper flakes — for a tiny kick

Instructions
1. Preheat your oven to 350°F and grease a standard muffin tin really well.
2. Combine the grated zucchini, chopped prosciutto, and shredded cheese in a medium bowl.
3. Divide the veggie and meat mixture evenly among 6 muffin cups.
4. Pour the beaten eggs over the fillings until each cup is about 3/4 full.
5. Bake for 18–20 minutes until the centers are set and the edges are golden.

These stay fresh in the fridge for about 4 days. Just pop one in the microwave for 20 seconds and you’re good.

Smoked Salmon and Avocado “Toast” (Cucumber Style)

Bread is great, but have you tried crisp cucumber slices as the base? It sounds basic, but the crunch is incredible. It’s light but the protein from the salmon and fats from the avocado keep you full for hours. It’s my “I feel like a grown-up” breakfast.

Ingredients
* 1 large English cucumber — sliced into 1/2 inch thick rounds
* 4 oz smoked salmon — torn into small pieces
* 1 ripe avocado — mashed with a fork
* 2 tbsp cream cheese — softened (optional, but recommended)
* 1 tsp “Everything Bagel” seasoning — for that salty, garlicky crunch
* 1/2 lemon — for a fresh squeeze

Instructions
1. Slice the cucumber into thick discs and lay them out on a plate.
2. Spread a tiny bit of cream cheese followed by a dollop of mashed avocado onto each round.
3. Top with a generous piece of smoked salmon.
4. Sprinkle the bagel seasoning over everything and add a squeeze of fresh lemon juice.
5. Eat them immediately while the cucumber is cold and crisp.

This is a “no-cook” win. Perfect for those humid summer mornings.

The “All the Greens” Turkey Scramble

This is what I make when I feel like I haven’t eaten a vegetable in three days. The ground turkey adds a massive protein hit without the heaviness of pork sausage. I used to feed this to my husband and he didn’t even realize it was “healthy.” He just liked the flavor.

Ingredients
* 1/2 lb ground turkey — lean or extra lean
* 2 large eggs — lightly whisked
* 2 cups fresh baby spinach — it looks like a lot, but it shrinks!
* 1/4 cup feta cheese — crumbled
* 1/2 tsp garlic powder — for depth
* 1 tbsp olive oil — for the pan

Instructions
1. Heat the oil in a large skillet over medium-high heat.
2. Brown the turkey, breaking it up into small bits until it’s no longer pink.
3. Toss in the spinach and cook for 1 minute until it starts to wilt down.
4. Pour in the eggs and stir gently until they are just barely set.
5. Finish by folding in the feta and garlic powder. The feta will get slightly melty and salty.

I love to top this with a splash of hot sauce. It wakes up your taste buds.

Peanut Butter & Hemp Seed “No-Oats”

Missing oatmeal? Same. This recipe uses seeds to mimic that warm, comforting texture without the carb heavy grains. It’s thick, nutty, and smells like a giant peanut butter cookie. My kids actually ask for bites of this one.

Ingredients
* 3 tbsp hemp hearts — these provide the “chew”
* 2 tbsp chia seeds — for thickness and fiber
* 1/4 cup almond flour — give it some body
* 1/2 cup unsweetened almond milk — or any nut milk
* 1 tbsp creamy peanut butter — look for “just peanuts and salt” on the label
* 1/2 tsp vanilla extract — makes it smell amazing

Instructions
1. Whisk the hemp hearts, chia seeds, almond flour, and almond milk in a small saucepan.
2. Cook over medium heat for 3–5 minutes, stirring constantly as it thickens up.
3. Remove from heat once it reaches your desired “oatmeal” consistency.
4. Swirl in the peanut butter and vanilla at the very end.
5. Serve warm. Top with a few berries if you have the carb room.

It’s cozy. Like a hug in a bowl.

Cottage Cheese & Sun-Dried Tomato Bowl

Don’t knock cottage cheese until you’ve tried it savory. If you grew up only eating it with canned peaches, this will blow your mind. It’s essentially a high-protein caprese salad for breakfast. The sun-dried tomatoes have such a concentrated, sweet-tart flavor.

Ingredients
* 1 cup small curd cottage cheese — full fat is much more satisfying
* 3 tbsp sun-dried tomatoes — packed in oil, drained and chopped
* 1 tbsp fresh basil — torn into bits
* 1 tbsp toasted pine nuts — for the crunch
* A drizzle of balsamic glaze — just a tiny bit goes a long way

Instructions
1. Scoop the cottage cheese into a shallow bowl.
2. Top with the chopped sun-dried tomatoes and fresh basil.
3. Sprinkle the pine nuts over the top for that buttery texture.
4. Drizzle the balsamic over it and add a crack of black pepper.

It takes two minutes. Seriously. Fastest breakfast ever.

Tips & Tricks

5 Low Carb High Protein Breakfast Ideas for All-Day Energy preparation

Make sure you squeeze the liquid out of your veggies like zucchini or spinach. Water is the enemy of a good egg muffin. Also, prep your proteins ahead of time. If the turkey is already browned in the fridge, your scramble takes three minutes instead of ten.

Life is busy. Breakfast shouldn’t make it harder. Pick one of these, try it tomorrow, and see how much better your afternoon feels. You’ve got this!

📋 Recipe Card

Zucchini and Prosciutto Egg Muffins

⏱️ Prep: 10 mins
🍳 Cook: 20 mins
👥 Serves: 2
🔥 Calories: 210
⏱️ Total Time: 30 mins

🥗 Ingredients

  • 6 large eggs
  • 1 medium zucchini, grated and squeezed dry
  • 4 slices prosciutto, chopped
  • 1/2 cup sharp cheddar cheese, shredded
  • 1/4 tsp black pepper
  • 1 pinch red pepper flakes

📋 Instructions

  1. 1Preheat oven to 350°F and grease a muffin tin.
  2. 2Mix grated zucchini, prosciutto, and cheese in a bowl.
  3. 3Divide the mixture into 6 muffin cups.
  4. 4Whisk eggs with pepper and flakes, then pour over the veggie mixture.
  5. 5Bake for 18-20 minutes until set and slightly brown on top.

🍴 Enjoy your meal! 🍴

📋 Recipe Card

Smoked Salmon Cucumber Rounds

⏱️ Prep: 10 mins
🍳 Cook: 0 mins
👥 Serves: 1
🔥 Calories: 285
⏱️ Total Time: 10 mins

🥗 Ingredients

  • 1 large English cucumber, sliced into 1/2 inch rounds
  • 4 oz smoked salmon
  • 1 ripe avocado, mashed
  • 2 tbsp cream cheese
  • 1 tsp Everything Bagel seasoning
  • 1/2 lemon, juiced

📋 Instructions

  1. 1Arrange cucumber slices on a plate.
  2. 2Spread a small amount of cream cheese on each slice.
  3. 3Add a spoonful of mashed avocado.
  4. 4Top with a piece of smoked salmon.
  5. 5Sprinkle with bagel seasoning and a squeeze of lemon.

🍴 Enjoy your meal! 🍴

📋 Recipe Card

Turkey and Spinach Scramble

⏱️ Prep: 5 mins
🍳 Cook: 10 mins
👥 Serves: 1
🔥 Calories: 340
⏱️ Total Time: 15 mins

🥗 Ingredients

  • 1/2 lb ground turkey
  • 2 large eggs
  • 2 cups fresh baby spinach
  • 1/4 cup feta cheese, crumbled
  • 1/2 tsp garlic powder
  • 1 tbsp olive oil

📋 Instructions

  1. 1Heat olive oil in a skillet over medium-high heat.
  2. 2Cook ground turkey until browned and fully cooked through.
  3. 3Add spinach and cook for 1 minute until wilted.
  4. 4Whisk eggs and pour into the pan, stirring until set.
  5. 5Stir in feta and garlic powder before serving.

🍴 Enjoy your meal! 🍴

📋 Recipe Card

Peanut Butter Hemp ‘No-Oats’

⏱️ Prep: 2 mins
🍳 Cook: 5 mins
👥 Serves: 1
🔥 Calories: 390
⏱️ Total Time: 7 mins

🥗 Ingredients

  • 3 tbsp hemp hearts
  • 2 tbsp chia seeds
  • 1/4 cup almond flour
  • 1/2 cup unsweetened almond milk
  • 1 tbsp creamy peanut butter
  • 1/2 tsp vanilla extract

📋 Instructions

  1. 1Combine hemp hearts, chia, almond flour, and milk in a saucepan.
  2. 2Cook over medium heat, stirring constantly, for about 5 minutes.
  3. 3Once thickened, remove from the heat.
  4. 4Stir in peanut butter and vanilla extract.
  5. 5Serve warm in a bowl.

🍴 Enjoy your meal! 🍴

📋 Recipe Card

Savory Sun-Dried Tomato Cottage Cheese Bowl

⏱️ Prep: 3 mins
🍳 Cook: 0 mins
👥 Serves: 1
🔥 Calories: 260
⏱️ Total Time: 3 mins

🥗 Ingredients

  • 1 cup full-fat cottage cheese
  • 3 tbsp sun-dried tomatoes in oil, chopped
  • 1 tbsp fresh basil, torn
  • 1 tbsp pine nuts, toasted
  • 1 tsp balsamic glaze

📋 Instructions

  1. 1Place cottage cheese in a serving bowl.
  2. 2Top with chopped sun-dried tomatoes and fresh basil.
  3. 3Scatter pine nuts over the top.
  4. 4Drizzle with balsamic glaze and freshly cracked black pepper.

🍴 Enjoy your meal! 🍴

The Ultimate Low Carb Savory Breakfast Power Bowls

The Ultimate Low Carb Savory Breakfast Power Bowls

This easy low carb breakfast bowl features sizzled sausage, creamy avocado, and jammy eggs.

This easy low carb breakfast bowl features sizzled sausage, creamy avocado, and jammy eggs. A healthy, protein-packed morning meal ready in just 15 minutes!

low carb breakfast, keto recipes, easy breakfast, healthy recipes, gluten free, meal prep, high protein

Crispy, salty, and incredibly creamy. This bowl wakes up your senses with the aroma of searing sausage and the bright citrus punch of fresh lime. It’s breakfast luxury in a bowl.

I used to be the person who grabbed a sugary granola bar and ran out the door, only to feel my energy crash by 10:00 AM. Everything changed when I started focusing on high-protein, low-carb starts. I remember the first time I made this specific bowl; it was a rainy Tuesday, and I was craving something comforting but knew I needed to stay sharp for a big work presentation. I threw together some leftover greens, a few jammy eggs, and some spiced sausage. It was a revelation. For the first time in years, I wasn’t reaching for a mid-morning snack. This meal feels like a warm hug that actually fuels your brain.

Why You’ll Love This Recipe

The Ultimate Low Carb Savory Breakfast Power Bowls

  • Sustained Energy — No sugar crashes here, just healthy fats and protein to keep your focus sharp all morning long.
  • Total Versatility — Use whatever veggies are lingering in your crisper drawer to keep things fresh and exciting.
  • Meal Prep Friendly — You can brown the meat and prep the greens ahead of time for a five-minute assembly.
  • Naturally Gluten-Free — This recipe relies on whole, unprocessed ingredients that are naturally free from grains and fillers.
  • Customizable Heat — Whether you love a mellow breakfast or a spicy kick, it’s easy to adjust the seasonings to your mood.

Essential Ingredients

  • Ground Pork or Turkey — This is your protein base. I love using pork sausage for those classic breakfast vibes, but ground turkey works if you want something leaner.
  • Fresh Baby Spinach — A massive handful of greens provides fiber and iron. It wilts down into almost nothing, making it easy to eat.
  • Hass Avocado — This provides the essential healthy fats that make the meal feel satisfying. Look for one that gives slightly when pressed.
  • Pasture-Raised Eggs — The star of the show. I prefer a soft-boiled egg with a liquid gold center that acts as a natural sauce for the meat.
  • Everything Bagel Seasoning — My secret weapon. It adds crunch, salt, and a punch of garlic and onion without adding any carbs.
  • Red Pepper Flakes — Just a pinch to wake up your palate and get the metabolism moving.
  • Fresh Cilantro — It adds a necessary herbal brightness that cuts through the richness of the egg and avocado.

How to Make It

Start by pulling your skillet out—cast iron is my favorite for getting those crispy, browned edges on the meat. Drop your ground sausage into the hot pan. You want to hear that aggressive sizzle the second it hits the metal. Use a wooden spoon to break it into small, craggly bits. As the fat renders out, the kitchen will start smelling like a cozy brunch spot. While the meat browns, get a small pot of water boiling for your six-minute eggs.

Once the water hits a rolling boil, gently lower the eggs in. Set your timer; precision is key for that jammy yolk. While those simmer, toss your handfuls of spinach directly into the skillet with the sausage. The residual heat and fat will wilt the greens in about sixty seconds—just enough to make them tender but still vibrant green.

Peel your eggs under cold running water. It’s a bit of a sensory thrill—the cold water against the warm shell. Slice them in half to reveal that molten center. Now, the assembly. Scoop the meat and greens into a wide bowl. Top with sliced avocado, those beautiful eggs, and a heavy-handed sprinkle of Everything Bagel seasoning. Finish with a squeeze of lime to make all the flavors pop.

Variations & Substitutions

  • Make it Vegetarian — Swap the sausage for halloumi cheese or a hearty serving of sautéed mushrooms seasoned with smoked paprika.
  • Dairy-Free Delight — This recipe is already dairy-free, but you can add a dollop of coconut milk yogurt for extra creaminess if desired.
  • Spice it Up — Add sliced pickled jalapeños or a drizzle of your favorite habanero hot sauce for a serious morning wake-up call.
  • Add Extra Crunch — Toss in some toasted pumpkin seeds or slivered almonds for a texture contrast that feels gourmet.
The Ultimate Low Carb Savory Breakfast Power Bowls preparation

Serving Suggestions

I love serving this alongside a steaming cup of black coffee or a light herbal tea. If you aren’t strictly low-carb, a small side of fresh berries adds a lovely sweetness to balance the savory notes. If you’re hosting friends, serve this in big individual crocks for a rustic, “farmhouse-chic” presentation that everyone loves.

How to Store & Reheat

The sausage and spinach mixture stores beautifully in an airtight container in the fridge for up to four days. To reheat, just pop it in a pan for two minutes until warmed through. I recommend making the eggs and avocado fresh each morning, as the texture is much better. If you must prep eggs, keep them in their shells until you’re ready to eat.

FAQ

Can I use frozen spinach?
You can, but make sure to squeeze out every drop of excess moisture first. Fresh is better for that light, sautéed texture.

What is the best way to peel soft-boiled eggs?
An ice bath is your best friend. Shocking the eggs stops the cooking and helps the shell pull away from the whites easily.

Is this recipe keto-friendly?
Absolutely. It is high in healthy fats, moderate in protein, and very low in net carbs.

Conclusion

Breakfast doesn’t have to be a choice between a sugar bomb or a boring plate of plain eggs. This savory power bowl is all about bold flavors and feeling your absolute best. It’s fast, it’s fresh, and it’s fueling. Give this a try tomorrow morning—your brain will thank you.

📋 Recipe Card

Low Carb Savory Breakfast Power Bowls

⏱️ Prep: 5 mins
🍳 Cook: 10 mins
👥 Serves: 2
🔥 Calories: 410
⏱️ Total Time: 15 mins

🥗 Ingredients

  • 1/2 lb ground pork or turkey breakfast sausage
  • 4 cups fresh baby spinach
  • 1 large Hass avocado, sliced
  • 4 large pasture-raised eggs
  • 1 tbsp Everything Bagel seasoning
  • 1 tsp red pepper flakes
  • 1/2 lime, cut into wedges
  • Handful of fresh cilantro

📋 Instructions

  1. 1Brown the sausage in a large skillet over medium-high heat, breaking it into small pieces with a spoon until golden and cooked through.
  2. 2Add the fresh spinach to the skillet with the meat and toss for 1-2 minutes until just wilted. Remove from heat.
  3. 3Place eggs in a pot of boiling water and cook for exactly 6 minutes for jammy yolks. Transfer immediately to an ice bath for 2 minutes, then peel and halve.
  4. 4Divide the sausage and spinach mixture between two bowls.
  5. 5Top each bowl with half an avocado (sliced) and two eggs.
  6. 6Garnish with everything bagel seasoning, red pepper flakes, fresh cilantro, and a squeeze of lime juice. Serve warm.

🍴 Enjoy your meal! 🍴

Sizzling Lemon Garlic Chicken and Zucchini Noodles

Sizzling Lemon Garlic Chicken and Zucchini Noodles

The ultimate high protein low calorie dinner that feels like a cheat meal. Tender

The ultimate high protein low calorie dinner that feels like a cheat meal. Tender gold-brown chicken meets zesty lemon and garlic. Lean, green, and delicious.

Ever have one of those days where you feel like you’ve been running a marathon but the clock only says 5 PM? Last Tuesday was that day for me. I wanted something that felt like a huge, comforting hug but didn’t leave me feeling sluggish or weighed down. I stood in front of my fridge, staring at a pack of chicken breasts and a few stray zucchinis. Ten minutes later, this dish happened. It was light, vibrantly fresh, and packed with enough protein to actually keep me full until breakfast. It’s been on my rotation every single week since.

Why You’ll Love This Recipe

  • High Protein, Low Carb — Each serving is packed with lean protein to support your goals without the heavy carb slump.
  • Under 400 Calories — You can eat a massive, satisfying portion while keeping your nutrition on track.
  • One Pan Cleanup — We use a single skillet for everything, meaning you won’t be stuck at the sink all night.
  • Fifteen-Minute Magic — It builds flavor incredibly fast, making it the perfect solution for your busiest weeknights.

Essential Ingredients

  • Chicken Breast — This is our star protein. Slice it into thin, bite-sized strips so it cooks quickly and stays juicy. You can use chicken thighs if you prefer, but breasts keep the calorie count much lower.
  • Zucchini — We transform these into “zoodles.” They provide that satisfying pasta-like volume for a fraction of the calories and act as a sponge for the sauce.
  • Fresh Garlic — Use at least four cloves. We want that pungent, savory aroma to fill the kitchen and infuse the oil.
  • Lemon Juice and Zest — This provides the brightness. The zest holds all the essential oils, so don’t skip it; it adds a floral citrus punch that bottled juice just can’t match.
  • Red Pepper Flakes — Just a pinch for a gentle warmth that balances the acidity of the lemon.
  • Parmesan Cheese — A small sprinkle goes a long way. It adds a salty, nutty finish that makes the dish feel truly gourmet.

How to Make It

Sizzling Lemon Garlic Chicken and Zucchini Noodles

Start by patting the chicken dry with paper towels. This is the secret to getting that beautiful golden-brown crust rather than steaming the meat. Season it generously with salt, pepper, and a dash of paprika. Heat a large heavy-bottomed skillet over medium-high heat with a drizzle of olive oil. Once the oil is shimmering, add the chicken in a single layer. Let it sit undisturbed for three minutes. You want to hear that satisfying sizzle; it means the Maillard reaction is working its magic. Flip the pieces once they are opaque halfway up the sides and brown on the bottom.

Remove the chicken and set it aside on a plate. Lower the heat to medium and add a bit more oil if the pan looks dry. Toss in your minced garlic and red pepper flakes. Stir constantly for about 60 seconds until the garlic turns a pale golden hue and smells incredible. Now, toss in the zucchini noodles. Use tongs to swirl them around, picking up all those flavorful brown bits from the bottom of the pan. Squeeze in the fresh lemon juice and add the zest.

The zucchini only needs about two to three minutes. You want them al dente—if you cook them too long, they will release too much water and turn mushy. Return the chicken to the pan, toss everything together one last time to get it coated in that garlic-lemon butter, and finish with a handful of chopped parsley and a dusting of parmesan.

Variations & Substitutions

  • Swap the Protein — Use large, peeled shrimp instead of chicken for an even faster cook time.
  • Make it Vegan — Use extra-firm tofu cubes (pressed well) and swap the parmesan for nutritional yeast.
  • Add More Bulk — If you aren’t strictly low carb, toss in a handful of cherry tomatoes or some baby spinach at the very end.
  • Change the Noodle — If you don’t have a spiralizer, use a vegetable peeler to make wide “ribbons” or swap for yellow summer squash.
Sizzling Lemon Garlic Chicken and Zucchini Noodles preparation

Serving Suggestions

I love serving this straight out of the pan. It looks beautiful with those bright green noodles and golden chicken. If you want a bit more texture, serve it alongside a crisp garden salad with a light vinaigrette. For those who aren’t watching carbs quite as closely, a single slice of crusty sourdough is perfect for mopping up any leftover lemon-garlic sauce at the bottom of the bowl.

How to Store & Reheat

This dish is best eaten fresh because zucchini can get watery when stored. However, it will keep in an airtight container in the fridge for up to two days. When reheating, do it quickly in a hot skillet rather than the microwave. This helps evaporate any excess moisture and keeps the chicken from getting rubbery. I don’t recommend freezing this, as the texture of the zucchini will change significantly.

FAQ

How do I stop my zucchini noodles from being watery?
The trick is to cook them fast over high heat and salt them only at the very end. If you salt them too early, the salt draws out the moisture and creates a “soup” in your pan.

Can I use pre-spiralized zucchini?
Absolutely. Many grocery stores sell them in the produce aisle. Just make sure they look fresh and snappy, not wilted or slimy.

Is this recipe spicy?
It has a tiny kick from the red pepper flakes, but it’s very mild. If you love heat, double the flakes!

Conclusion

This meal proves that “diet food” doesn’t have to be boring or bland. It’s fire-bright, zesty, and so satisfying. When you’re tired but want to stay on track, this is the recipe to reach for. Grab your skillet and get cooking!

📋 Recipe Card

Lemon Garlic Chicken and Zucchini Noodles

⏱️ Prep: 10 minutes
🍳 Cook: 10 minutes
👥 Serves: 2
🔥 Calories: 345 kcal
⏱️ Total Time: 20 minutes

🥗 Ingredients

  • 1 lb boneless skinless chicken breast, thinly sliced
  • 2 large zucchinis, spiralized into noodles
  • 4 cloves garlic, minced
  • 1 tablespoon olive oil
  • 1/2 teaspoon crushed red pepper flakes
  • 1 large lemon (juiced and zested)
  • 2 tablespoons fresh parsley, chopped
  • 2 tablespoons grated Parmesan cheese
  • Salt and black pepper to taste

📋 Instructions

  1. 1Season the sliced chicken breast with salt, pepper, and a pinch of paprika.
  2. 2Heat olive oil in a large skillet over medium-high heat. Add chicken and sear until golden and cooked through, about 5-6 minutes. Remove chicken from pan and set aside.
  3. 3In the same skillet, add the minced garlic and red pepper flakes. Sauté for 1 minute until fragrant.
  4. 4Add the zucchini noodles to the skillet. Toss with tongs for 2-3 minutes until slightly softened but still firm.
  5. 5Add the lemon juice, lemon zest, and cooked chicken back into the pan. Toss to combine and heat through.
  6. 6Remove from heat. Garnish with fresh parsley and Parmesan cheese before serving immediately.

🍴 Enjoy your meal! 🍴

Easy Low Carb Recipes for Energy: A Full Day of Eats

Easy Low Carb Recipes for Energy: A Full Day of Eats

Learn how to fuel your body with these easy low carb recipes for energy.

Learn how to fuel your body with these easy low carb recipes for energy. Delicious, satisfying meals that keep you full and focused from morning until night.

low carb, keto recipes, energy boosting, meal prep, healthy breakfast, easy lunch, low carb dinner, sugar free

Crispy edges on a perfect fried egg. The bright, zesty aroma of fresh lime hitting seared shrimp. Deep, dark chocolate melting into nutty almond butter. This is low carb eating that actually feels like a feast.

Easy Low Carb Recipes for Energy: A Full Day of Eats

A Day of Vibrant Fuel

I used to think low carb meant eating plain chicken breasts and limp stalks of celery until I reached a breaking point. I was tired, grumpy, and honestly, just bored. Everything changed when I stopped focusing on what I was cutting out and started looking at the beautiful, high-energy ingredients I could put in. Now, my kitchen is a laboratory of vibrant fats and crunchy greens. This specific “day of eats” is my go-to when I have a busy schedule and need my brain to stay sharp. It is about steady energy, not the mid-afternoon sugar crash we all dread. I first started making these zucchini boats on a rainy Tuesday when I had zero motivation, and they’ve become a weekly staple ever since. They are comforting like a warm hug but light enough that I don’t need a nap immediately after eating.

Why You’ll Love This Recipe

Steady energy levels — Say goodbye to the 3 PM slump; these recipes keep your blood sugar stable all day long.
Minimal prep time — Most of these meals come together in under 20 minutes because nobody has time to spend all day in the kitchen.
High in healthy fats — We use avocado, nuts, and olive oil to keep you feeling full and satisfied between meals.
Easy to customize — These are flexible templates; use whatever protein or veggies you happen to have in your crisper drawer.

Essential Ingredients

For a successful low carb day, your pantry needs a few heavy hitters. Avocados are the crown jewel here; they provide that creamy texture and heart-healthy fat that signals to your brain that you are full. I always keep a bag of almond flour on hand for quick breading or thickening sauces without the carb load. Zucchini is our primary vessel today—it is mild, hydrates you, and mimics pasta or bread surprisingly well when roasted. For protein, we are sticking with eggs and shrimp. Shrimp is a secret weapon because it cooks in about three minutes flat. Don’t forget heavy cream or full-fat coconut milk. That little splash of richness in your morning coffee or evening sauce makes the whole lifestyle feel indulgent rather than restrictive.

How to Make It

We start the morning with Pesto Fried Eggs. This isn’t just breakfast; it’s an awakening. Place a dollop of high-quality basil pesto in a hot skillet. Once it starts to sizzle and the oil separates, crack two eggs right into the green pool. The whites will fry in the herb oil, becoming lacy and crisp at the edges while the yolk stays liquid gold. Serve this over half a smashed avocado with a sprinkle of red pepper flakes.

For lunch, we are doing Cold Roast Beef Roll-ups. Lay out slices of deli roast beef, spread a thin layer of herbed cream cheese, and add a spear of crunchy pickle and some sprouts. Roll them tight. They are salty, crunchy, and require zero cooking.

Dinner is the showstopper: Garlic Butter Shrimp Zucchini Boats. First, slice your zucchini in half lengthwise and scoop out the seeds to create a trough. Roast these at 400°F until they are tender-crisp. While they roast, toss your shrimp in a pan with a massive knob of salted butter and minced garlic. Watch for that moment they turn from translucent to a perfect pearly pink. Nestle the shrimp into the zucchini channels, top with a dusting of parmesan, and broil for two minutes until the cheese is bubbly and browned.

Variations & Substitutions

Make it dairy-free — Use coconut oil instead of butter for the shrimp and swap the cream cheese for a tablespoon of hummus or tahini.
Change the protein — If you aren’t a fan of shrimp, ground turkey seasoned with taco spices works beautifully in the zucchini boats.
Add more crunch — For the egg breakfast, sprinkle a tablespoon of hemp hearts or toasted pumpkin seeds over the top for extra texture and magnesium.

Easy Low Carb Recipes for Energy: A Full Day of Eats preparation

Serving Suggestions

Serve the dinner zucchini boats with a side of leafy greens tossed in a simple lemon vinaigrette. The acidity of the lemon cuts through the richness of the garlic butter perfectly. If you want something warm on the side, a bowl of cauliflower rice steamed with a little lime zest adds bulk without the heavy carbs.

How to Store & Reheat

The roast beef rolls are best eaten fresh, but the zucchini boats actually hold up well for lunch the next day. Store them in an airtight glass container in the fridge for up to three days. To reheat, avoid the microwave if possible; a quick 5-minute warm-up in a toaster oven or air fryer keeps the zucchini from getting soggy and revives the snap of the shrimp.

FAQ

Easy Low Carb Recipes for Energy: A Full Day of Eats

Will this keep me full? Yes! The combination of protein and healthy fats digests slowly, providing a sustained release of energy.
Can I drink coffee? Absolutely. Try it black or with a splash of heavy cream. Avoid sugar and honey to keep your insulin levels steady.
Is this keto-friendly? These meals are naturally very low in net carbs, making them perfect for a ketogenic or general low carb lifestyle.
What about snacks? If you get hungry, reach for macadamia nuts or a hard-boiled egg.

Conclusion

Eating well shouldn’t feel like a chore. By focusing on fresh ingredients and bold flavors, you can fuel your body effectively. These meals are designed to make you feel powerful. Give this full day of eating a try and feel the difference!

📋 Recipe Card

Garlic Butter Shrimp Zucchini Boats

⏱️ Prep: 10 minutes
🍳 Cook: 20 minutes
👥 Serves: 2
🔥 Calories: 385
⏱️ Total Time: 30 minutes

🥗 Ingredients

  • 2 large zucchinis, halved lengthwise
  • 1/2 lb medium shrimp, peeled and deveined
  • 3 tbsp salted butter
  • 3 cloves garlic, minced
  • 1/4 cup shredded parmesan cheese
  • 1/2 tsp red pepper flakes
  • 1 tbsp fresh parsley, chopped
  • 1 tbsp olive oil

📋 Instructions

  1. 1Preheat your oven to 400°F (200°C).
  2. 2Scoop the centers out of the zucchini halves using a teaspoon to create a boat shape.
  3. 3Brush zucchini with olive oil, season with salt, and roast for 15 minutes until tender.
  4. 4While zucchini roasts, melt butter in a skillet over medium heat.
  5. 5Add garlic and cook for 1 minute until fragrant. Add shrimp and cook until pink (about 3-4 minutes).
  6. 6Remove zucchini from oven and spoon the shrimp and garlic butter into the hollowed centers.
  7. 7Top with parmesan cheese and red pepper flakes.
  8. 8Broil for 2-3 minutes until the cheese is golden and bubbly. Garnish with parsley and enjoy.

🍴 Enjoy your meal! 🍴

15-Minute Low Carb Lemon Garlic Butter Shrimp

15-Minute Low Carb Lemon Garlic Butter Shrimp

Discover the ultimate 15-minute low carb protein meal. Juicy shrimp, zesty lemon, and rich

Discover the ultimate 15-minute low carb protein meal. Juicy shrimp, zesty lemon, and rich garlic butter create a healthy dinner that tastes like a luxury.

  • Sizzling butter, the sharp aroma of fresh garlic, and the bright zing of citrus hitting a hot pan. This shrimp dish is snappy, succulent, and dripping with flavor. It is the definition of fast-casual gourmet.

A Tuesday Night Lifesaver

We have all been there. It is 6:30 PM, the fridge looks empty, and the temptation to order takeout is hovering at an all-time high. Last Tuesday, I was staring at a bag of frozen shrimp and feeling totally uninspired. I needed something high protein to stay on track with my goals, but I didn’t want to spend an hour over the stove. I threw some butter in a pan, grabbed a lemon that was looking a bit lonely in the crisper, and had a restaurant-quality meal on the table before the dishwasher finished its cycle. It felt like a small victory in a chaotic week. This recipe has since become my go-to “emergency” meal because it delivers so much punch with almost zero effort.

Why You’ll Love This Recipe

  • Extreme speed — You will go from prep to plate in under 15 minutes flat.
  • Macro-friendly — This is a powerhouse of lean protein while keeping the carb count near zero.
  • Minimal cleanup — One pan is all you need, meaning fewer dishes and more time to relax.
  • Flavor bomb — The combination of lemon juice and garlic creates a sauce you will want to drizzle over everything.

Essential Ingredients

Building a great meal in minutes requires ingredients that do the heavy lifting for you.

  • Jumbo Shrimp — I prefer the 16/20 count for a meaty texture. Ensure they are peeled and deveined to save yourself the hassle.
  • Salted Butter — This provides the fat and the base for our savory sauce. Use a high-quality grass-fed butter if you can.
  • Fresh Garlic — Please skip the jarred stuff here. Mince three large cloves to get that pungent, spicy kick that cuts through the fat.
  • Red Pepper Flakes — Just a pinch adds a tiny bit of heat that wakes up your palate without being overwhelming.
  • Fresh Lemon — You need both the zest and the juice. The zest holds the oils that provide a floral aroma, while the juice provides the acid.
  • Parsley — A handful of chopped flat-leaf parsley adds a pop of green and a fresh, earthy finish to the richness.

How to Make It

Start by patting your shrimp dry with a paper towel. This is a crucial step; if they are wet, they will steam instead of sear. Sprinkle them lightly with salt and pepper. Place a large skillet over medium-high heat and drop in your butter. Once the butter starts to foam and turn slightly golden, toss in the shrimp.

Sear the shrimp for about two minutes on the first side. You are looking for a beautiful pink hue and slightly curled edges. Flip them over and immediately add your minced garlic and red pepper flakes. You want to cook the garlic just until it becomes fragrant—usually about 30 to 60 seconds—to avoid burning those delicate bits.

Squeeze the fresh lemon juice directly into the pan. The liquid will bubble and emulsify with the butter, creating a glossy, golden sauce that coats every shrimp. Toss in the lemon zest and the chopped parsley. Give it one final stir to incorporate all those pan drippings. The kitchen should smell like a coastal Italian bistro at this point. Remove from heat immediately so the shrimp stay tender and snappy, never rubbery.

Variations & Substitutions

  • Add some greens — Throw two cups of baby spinach into the pan at the very end. It will wilt in the residual heat and soak up the butter sauce.
  • Make it dairy-free — Swap the butter for a high-quality extra virgin olive oil or a vegan butter substitute.
  • Swap the protein — If you aren’t a fan of shellfish, this same garlic-lemon-butter base works beautifully with scallops or thinly sliced chicken breast.
  • Give it a crunch — Top with toasted sliced almonds or pine nuts for an extra layer of texture.
15-Minute Low Carb Lemon Garlic Butter Shrimp preparation

Serving Suggestions

Since we are keeping it low carb, this is perfection served over a bowl of zucchini noodles or cauliflower rice. The “rice” acts like a sponge for that glorious lemon-garlic butter. If you aren’t strictly keto, a side of roasted asparagus or a crisp arugula salad with a light vinaigrette balances the richness of the butter perfectly.

How to Store & Reheat

Shrimp is always best enjoyed fresh to maintain that “snap,” but leftovers will stay delicious in an airtight container in the fridge for up to two days. To reheat, avoid the microwave—it turns shrimp into rubber erasers. Instead, warm them in a small skillet over low heat with a splash of water or a tiny bit of extra butter until just heated through.

 Lemon Garlic Butter Shrimp

FAQ

Can I use frozen shrimp?
Actually, I recommend it! Most “fresh” shrimp at the counter was previously frozen anyway. Just thaw them under cold running water for a few minutes and dry them thoroughly before cooking.

How do I know when the shrimp are done?
Look for the “C” shape. If they are straight, they aren’t done. If they are curled into a tight “O,” they are overcooked. A perfect “C” means they are juicy and tender.

Is this recipe keto-friendly?
Yes, it is naturally very low in carbohydrates and high in healthy fats and protein.

Conclusion

You don’t need hours in the kitchen to eat well. This lemon garlic shrimp proves that simple, fresh ingredients can create a masterpiece in the time it takes to set the table. It is bright, savory, and incredibly satisfying. Give it a try tonight!

📋 Recipe Card

15-Minute Low Carb Lemon Garlic Butter Shrimp

⏱️ Prep: 5 mins
🍳 Cook: 10 mins
👥 Serves: 2
🔥 Calories: 310 kcal
⏱️ Total Time: 15 mins

🥗 Ingredients

  • 1 lb jumbo shrimp, peeled and deveined
  • 3 tbsp salted butter
  • 3 cloves garlic, minced
  • 1/2 tsp red pepper flakes
  • 1 large lemon, zested and juiced
  • 2 tbsp fresh parsley, chopped
  • Salt and black pepper to taste

📋 Instructions

  1. 1Pat the shrimp dry with paper towels and season with salt and pepper.
  2. 2Melt butter in a large skillet over medium-high heat until foaming.
  3. 3Add shrimp to the pan in a single layer. Sear for 2 minutes without moving them.
  4. 4Flip the shrimp. Add minced garlic and red pepper flakes. Cook for 1 minute until fragrant.
  5. 5Pour in the lemon juice and zest. Toss to coat the shrimp as the sauce thickens slightly.
  6. 6Remove from heat, garnish with fresh parsley, and serve immediately.

🍴 Enjoy your meal! 🍴

Healthy Yogurt Parfait Bar

Ultimate Healthy Yogurt Parfait Bar: Best Breakfast Ideas

Crunchy granola, velvet yogurt, and bursts of tart berry juice. This DIY breakfast bar

Crunchy granola, velvet yogurt, and bursts of tart berry juice. This DIY breakfast bar is a morning ritual that looks like art and tastes like dessert. Cool, creamy, and totally customizable.

My first encounter with a yogurt bar wasn’t at a fancy brunch; it was during a chaotic family reunion at my aunt’s house. She had ten hungry cousins to feed and zero interest in flipping individual pancakes. She lined up mismatched bowls filled with sliced fruit, toasted nuts, and creamy Greek yogurt, then told us to go wild. I watched my youngest cousin pile on mountains of blueberries while my uncle went heavy on the hemp seeds. It was the most peaceful meal of the entire trip. Everyone got exactly what they wanted, and I realized that the best meals aren’t “made”—they are assembled with love and a bit of crunch.

Why You’ll Love This Recipe

  • Zero morning cooking — No pans to scrub or ovens to preheat while you are still blurry-eyed and caffeinated.
  • Highly customizable — Whether you are dairy-free, low-carb, or a protein seeker, there is a combination for you.
  • Perfect for crowds — It’s the ultimate stress-free solution for bridal showers, sleepovers, or holiday brunches.
  • Meal prep friendly — You can prep the toppings on Sunday and have a five-minute breakfast ready for the entire work week.
  • Naturally balanced — You get healthy fats, fiber, and probiotics in every single bite without even trying.

Essential Ingredients

Building the perfect parfait bar requires a balance of textures. You need the base, the crunch, the sweetness, and the superfoods.

  • Greek Yogurt — This is your canvas. I prefer plain full-fat Greek yogurt for that ultra-thick, velvety texture and punch of protein. You can also offer a vanilla bean version for those who like it sweeter.
  • Fresh BerriesStrawberries, blueberries, and raspberries add a pop of color and essential antioxidants. Pick what’s in season for the best flavor.
  • Granola — This provides the essential “crunch” factor. Look for a low-sugar granola with clusters or make your own with rolled oats and honey.
  • Honey or Maple Syrup — Since we are using plain yogurt, a drizzle of raw honey or pure maple syrup allows everyone to control their own sweetness level.
  • Nut Butters — A dollop of creamy almond butter or drippy peanut butter adds richness and keeps you full until lunch.
  • Seeds and Nuts — Think chia seeds, flax seeds, and slivered almonds. They add earthy flavor and a nutritional boost.

How to Make It

Setting up a parfait bar is all about the visual appeal. Start by choosing a long board or a clear section of your kitchen counter. Place your yogurt containers in the center—if you are feeling fancy, scoop the yogurt into a large glass trifle bowl so guests can see the creamy texture.

Next, arrange your fruit bowls. I like to macerate the strawberries for ten minutes in a tiny bit of lemon juice to bring out their natural syrups. Arrange the dried goods like granola, toasted coconut, and chopped walnuts in smaller crocks.

The secret to a great parfait is the layering technique. Encourage your guests to start with a small dollop of yogurt at the bottom of their glass. Follow this with a layer of crunchy granola, then a layer of vibrant fruit. Repeat the layers until the glass is full. This ensures you get a bit of everything in every spoonful. Finish the bar with “the drizzles”—bottles of syrup and jars of nutt butters with small spoons. Watch the colors mingle as the honey drips down the sides of the glass, hitting the berries and creating a beautiful, marbled effect.

Variations & Substitutions

The beauty of a bar is the flexibility. You can pivot based on what is in your pantry or your guests’ dietary needs.

  • Vegan Option — Swap the dairy for a thick coconut milk yogurt or an almond-based yogurt. Both pair beautifully with tropical fruits.
  • Tropical Twist — Use diced mango, pineapple, and toasted macadamia nuts for a vacation-in-a-bowl vibe.
  • Chocolate Fix — Add a bowl of dark chocolate chips or cacao nibs for those who want a decadent breakfast.
  • Autumn Vibes — Use canned pumpkin puree swirled into the yogurt with pumpkin pie spice and pecans.
Ultimate Healthy Yogurt Parfait Bar: Best Breakfast Ideas preparation

Serving Suggestions

I love serving these in wide-mouth mason jars or clear stemless wine glasses. It makes the layers look incredible. If you are hosting a brunch, serve this alongside a platter of soft-boiled eggs or sourdough toast for a savory contrast. A carafe of iced coffee or hot matcha completes the spread perfectly.

How to Store & Reheat

If you have leftovers from your bar, store the yogurt, fruit, and dry toppings in separate airtight containers in the fridge. Granola must stay in a dry pantry so it doesn’t lose its snap. The fruit will stay fresh for about 3 days. Do not pre-assemble parfaits more than 6 hours in advance, or the granola will turn soft and soggy.

Ultimate Healthy Yogurt Parfait Bar

FAQ

Can I use frozen fruit?
Yes, but let it thaw first. The thawed juices actually taste amazing swirled into the yogurt, though it won’t be as “pretty” as fresh fruit.

How do I keep the granola crunchy?
Always add the granola last or keep it in a separate container until the very moment you are ready to eat.

Is Greek yogurt better than regular yogurt?
Greek yogurt is strained, making it thicker and higher in protein, which I find holds up better against heavy toppings.

How much yogurt should I plan per person?
Usually, one cup per person is plenty, especially if you have a wide variety of filling toppings like nuts and seeds available.

This bar is the easiest way to bring joy to your morning. It is vibrant, fresh, and genuinely fun to put together. Grab those jars and start layering!

📋 Recipe Card

Healthy Yogurt Parfait Bar

⏱️ Prep: 15 minutes
🍳 Cook: 0 minutes
👥 Serves: 6
🔥 Calories: 280
⏱️ Total Time: 15 minutes

🥗 Ingredients

  • 32 oz Plain Greek Yogurt
  • 2 cups Granola (low sugar)
  • 1 cup Fresh Strawberries, sliced
  • 1 cup Fresh Blueberries
  • 1/2 cup Raspberries
  • 1/4 cup Chia seeds
  • 1/2 cup Sliced almonds
  • 1/4 cup Raw honey or Maple syrup
  • 1/4 cup Almond butter
  • 2 tbsp Toasted coconut flakes

📋 Instructions

  1. 1Place the Greek yogurt in a large serving bowl or individual jars.
  2. 2Wash and prep all fruit, placing them into small, accessible bowls.
  3. 3Arrange the granola, nuts, seeds, and coconut flakes in separate containers nearby.
  4. 4Set out honey, maple syrup, and nut butters with drizzle spoons.
  5. 5To assemble, layer yogurt first, followed by a handful of granola and a scoop of fruit.
  6. 6Repeat the layers once more.
  7. 7Top with a sprinkle of chia seeds, almond slivers, and a final drizzle of honey.

🍴 Enjoy your meal! 🍴

My-Secret-Garlic-Herb-Chicken-Rainbow-Veggie-Bowls

My Secret Garlic Herb Chicken & Rainbow Veggie Bowls

Looking for healthy meal prep ideas that actually taste good? These Garlic Herb Chicken

Looking for healthy meal prep ideas that actually taste good? These Garlic Herb Chicken and Rainbow Veggie Bowls stay fresh and delicious choice.

The smell of browned garlic and roasting bell peppers filling your kitchen is the ultimate Sunday afternoon vibe. Imagine opening your fridge on a Tuesday and finding a row of vibrantly colored containers waiting for you. Juicy, golden chicken breast, crisp-tender broccoli, and a hint of zesty lemon—this isn’t a sad, dry desk lunch. This is the kind of meal that makes your coworkers lean over and ask for the recipe.

The Meal Prep Struggle Is Over

I used to be the person who viewed meal prep as a chore. I’d spend hours on a Sunday making “healthy” meals that tasted like damp cardboard by Wednesday. It was depressing. My fridge was a graveyard of half-eaten tupperware. I realized the secret wasn’t just about making food in bulk; it was about choosing ingredients that hold their texture and flavors that actually get better as they sit.

I first started making these Rainbow Veggie Bowls during a particularly hectic semester when I felt like I was living on coffee and granola bars. I needed something that felt like a real meal but took zero brainpower during the week. The first time I bit into the roasted sweet potatoes paired with the tangy herb marinade, I knew I’d found the “one.” Now, this is my go-to “reset” recipe whenever life gets a little too loud. It’s reliable, it’s nourishing, and it’s genuinely satisfying.

Why You’ll Love This Recipe

  • Zero “Soggy Veggie” Syndrome — We use hearty vegetables like sweet potatoes and broccoli that maintain their structure even after reheating.
  • Massive Protein Punch — Between the chicken breast and the optional quinoa base, you’re looking at a meal that keeps you full until dinner.
  • Infinite Customization — Think of this as a template; you can swap the veggies or the protein based on what’s lingering in your crisper drawer.
  • Budget-Friendly — We’re using staple ingredients like onions, carrots, and frozen peas that won’t break the bank but deliver big on nutrients.
  • One-Pan Cleanup — Aside from the bowls, almost everything is roasted on sheet pans, meaning fewer dishes for you to wash.

Essential Ingredients

  • Chicken Breast — The lean star of the show. I prefer cutting them into uniform cubes so they cook evenly and stay tender. You can use thighs if you prefer a juicier, fattier cut.
  • Sweet Potatoes — These provide the complex carbs you need for energy. They roast up with caramelized edges that add a lovely natural sweetness.
  • Broccoli Florets — These act like little sponges for the garlic-herb oil. Make sure to cut them into bite-sized pieces.
  • Bell Peppers — I use a mix of red, yellow, and orange for that “rainbow” look. They add a bright, pepper-sweet jewelry to the bowl.
  • Red Onion — When roasted, red onion loses its sharp bite and becomes mellow and sweet. It’s the hidden flavor hero here.
  • Olive Oil — Use a good quality extra virgin oil to coat everything. It carries the spices and helps the veggies get those crispy bits.
  • Dried Oregano and Thyme — This classic herb combo gives the chicken a Mediterranean flair that never gets old.
  • Fresh Lemon — A heavy squeeze of lemon juice at the end brightens the whole dish and cuts through the richness of the roasted oil.

How to Make It

Start by preheating your oven to 400°F (200°C). While that’s warming up, grab your largest cutting board. We’re going to do all our chopping at once. Peel and cube your sweet potatoes into half-inch pieces. Chop the bell peppers and red onion into similar-sized squares. If your broccoli florets are huge, give them a quick chop too. Consistency is key here; you want everything to be ready at roughly the same time.

Line two large sheet pans with parchment paper. On the first pan, toss the sweet potatoes with a drizzle of olive oil, salt, and pepper. These take the longest, so they get their own space. Put them in the oven for about 10 minutes before adding the rest.

While the potatoes get a head start, toss your chicken cubes in a bowl with olive oil, minced garlic, oregano, thyme, and a pinch of red pepper flakes. Ensure every piece of chicken is glistening and coated in herbs. On the second sheet pan, spread out the broccoli, peppers, onions, and the seasoned chicken. Don’t crowd the pan! If the ingredients are too close, they’ll steam instead of roasting. You want that high-heat contact to create those brown, flavorful spots.

Slide the second pan into the oven. Roast everything for another 15-20 minutes. You’ll know it’s ready when the chicken is opaque and firm to the touch and the broccoli edges are starting to turn a deep, charred brown. The smell of the roasting garlic will be absolutely intoxicating at this point.

Once finished, pull the pans out and let them cool for a few minutes. While they rest, whisk together a quick “refresher” of lemon juice and a little more olive oil. Drizzle this over the pans while they’re still warm—the heat helps the flavors soak right into the meat and veg.

Variations & Substitutions

  • Make it Vegan — Swap the chicken for two cans of chickpeas or a block of drained, cubed extra-firm tofu. Both roast beautifully alongside the veggies.
  • Low-Carb Version — Replace the sweet potatoes with cauliflower florets or extra zucchini. This significantly drops the carb count while keeping the volume high.
  • Grain Base — If you’re extra hungry, serve these over a bed of fluffy quinoa or brown rice. It’s great for soaking up any extra herb oil.
  • Spicy Kick — Add a teaspoon of smoked paprika or a dollop of sriracha to the marinade if you like a little heat in your lunch.
My Secret Garlic Herb Chicken & Rainbow Veggie Bowls preparation

Serving Suggestions

I love eating these bowls as-is, but a creamy element really takes them over the top. A dollop of Greek yogurt or a few slices of ripe avocado adds a cooling contrast to the roasted spices. If you have some fresh parsley or cilantro in the fridge, chop it up and sprinkle it on top just before eating. It adds a “fresh” hit that makes the meal feel like it was just cooked that minute.

How to Store & Reheat

This recipe makes enough for four generous servings. Divide the chicken and veggies into four airtight glass containers. Glass is best because it doesn’t retain odors and makes reheating much more even. These will stay fresh in the fridge for up to 4 days.

When you’re ready to eat, you can microwave them for about 90 seconds. If you have the time, popping the portion back into an air fryer for 3-4 minutes at 350°F will revive the crispy edges of the potatoes and chicken perfectly.

FAQ

Can I use frozen vegetables for this meal prep?
You can, but the texture will be softer. If using frozen broccoli, add it directly to the pan without thawing, but realize it won’t get as crispy as fresh. Avoid frozen peppers if you can, as they release a lot of water.

How do I keep the chicken from getting dry when reheating?
The key is the size of the cubes and not overcooking them initially. Also, adding that drizzle of lemon oil at the end of the cooking process creates a moisture barrier that helps the chicken stay juicy in the fridge.

Is this recipe freezer-friendly?
Yes! You can freeze these portions for up to 3 months. Let them thaw in the fridge overnight before reheating for the best results.

Get Prepping!

There is no better feeling than knowing your “past self” took care of your “future self.” Spending 45 minutes in the kitchen today means four days of stress-free, delicious, and healthy eating. Grab your sheet pans and get roasting! Your Tuesday afternoon self will thank you.

📋 Recipe Card

Garlic Herb Chicken & Rainbow Veggie Bowls

⏱️ Prep: 20 minutes
🍳 Cook: 30 minutes
👥 Serves: 4
🔥 Calories: 385
⏱️ Total Time: 50 minutes

🥗 Ingredients

  • 1.5 lbs chicken breast, cut into 1-inch cubes
  • 2 large sweet potatoes, peeled and cubed
  • 1 large head of broccoli, cut into florets
  • 2 bell peppers (any color), chopped
  • 1 small red onion, diced
  • 3 tablespoons extra virgin olive oil
  • 3 cloves garlic, minced
  • 1 tablespoon dried oregano
  • 1 teaspoon dried thyme
  • 1/2 teaspoon red pepper flakes (optional)
  • Salt and black pepper to taste
  • 1 fresh lemon, juiced

📋 Instructions

  1. 1Preheat your oven to 400°F (200°C) and line two large sheet pans with parchment paper.
  2. 2Place cubed sweet potatoes on the first pan. Drizzle with 1 tablespoon of olive oil, salt, and pepper. Roast for 10 minutes.
  3. 3In a large bowl, whisk together the remaining olive oil, minced garlic, oregano, thyme, and red pepper flakes.
  4. 4Add the chicken cubes to the bowl and toss until thoroughly coated.
  5. 5On the second sheet pan, spread out the broccoli, bell peppers, and red onion. Add the seasoned chicken cubes into the gaps between vegetables.
  6. 6Remove the sweet potato pan from the oven, give them a toss, and place both pans back into the oven.
  7. 7Roast for an additional 18-22 minutes, or until the chicken reaches an internal temperature of 165°F and the vegetables are tender and browned.
  8. 8Remove from the oven and immediately drizzle the fresh lemon juice over both pans.
  9. 9Divide the mixture evenly into four meal prep containers. Store in the refrigerator for up to 4 days.

🍴 Enjoy your meal! 🍴

Super Juicy Lemon Herb Grilled Chicken & Asparagus

Super Juicy Lemon Herb Grilled Chicken & Asparagus

Succulent, charred, and bursting with citrus. This is the ultimate high-protein, low-carb dinner that

Succulent, charred, and bursting with citrus. This is the ultimate high-protein, low-carb dinner that actually tastes like a feast. It’s clean eating that doesn’t feel like a sacrifice.

Sometimes, life feels like a constant juggle between wanting to feel your best and wanting to eat something that doesn’t taste like cardboard. I remember sitting at my kitchen table three years ago, staring at a plate of bland, boiled chicken breasts and thinking, *there has to be a better way.* I was trying to hit my protein goals while keeping things low carb, but I was failing the flavor test. That’s when I started experimenting with high-acid marinades and high-heat searing.

This recipe is the result of those “protein-loading” experiments. It’s the meal I turn to when I’ve had a massive workout or when I just want to feel light and energized for the next day. It has become a staple in my house, not because it’s “diet food,” but because the zesty lemon juice and fresh rosemary create a pan sauce that I would honestly eat off a shoe. It’s simple, honest, and incredibly satisfying.

Why You’ll Love This Recipe

  • Protein-Packed Powerhouse — With over 40 grams of protein per serving, this meal keeps you full and fueled for hours.
  • Minimal Cleanup — We’re using one grill or one large sheet pan, meaning you won’t be stuck at the sink all night.
  • Under 10 Net Carbs — Perfectly keto-friendly and ideal for anyone watching their blood sugar levels.
  • Meal Prep Friendly — This chicken actually stays juicy when reheated, making your Tuesday lunch something to look forward to.
  • Bursting with Freshness — No heavy creams or fake fillers, just bright herbs and healthy fats.

Essential Ingredients

  • Boneless Skinless Chicken Breasts — The clean slate of the protein world. I prefer organic when possible for the best texture. If your breasts are massive, butterfly them or pound them to an even thickness so they cook through without drying out.
  • Fresh Asparagus — These snappy spears provide the crunch. Look for medium-thickness stalks; they hold up better to high heat than the pencil-thin ones.
  • Extra Virgin Olive Oil — This is our fat source. It carries the flavor of the herbs and ensures the chicken gets those beautiful golden-brown grill marks.
  • Fresh Lemons — We use both the zest and the juice. The juice tenderizes the fibers of the meat, while the zest provides that essential aromatic punch.
  • Garlic Cloves — Please, use fresh garlic here. The jarred stuff has a metallic tang that ruins the delicacy of the herbs. Smash them and mince them into a paste.
  • Fresh Rosemary and Thyme — These woody herbs are heat-stable, meaning they won’t burn and turn bitter like basil would. They infuse the oil with an earthy, piney fragrance.
  • Red Pepper Flakes — Just a pinch for a “back of the throat” heat that cuts through the richness of the olive oil.

How to Make It

First, we focus on the marinade. In a large glass bowl, whisk together your olive oil, lemon zest, lemon juice, minced garlic, and chopped herbs. You want this to look like a thick, green-flecked dressing. Toss your chicken breasts into the bowl and massage the liquid into the meat. Let it sit. Even 20 minutes makes a difference, but two hours in the fridge is the gold standard.

While the chicken marinates, prep your asparagus. Snap off the woody ends—they usually break naturally at the right spot. Toss them with a drizzle of oil and a heavy pinch of kosher salt.

Now, heat your grill or a heavy cast-iron skillet over medium-high heat. You want to hear a loud sizzle the second that meat hits the surface. Lay the chicken down and leave it alone. Don’t poke it. Don’t move it. You need about 6 minutes on the first side to develop a deep, caramelized crust.

Flip the chicken and immediately add the asparagus to the empty spaces in the pan or on the grill. The asparagus will pick up the wandering juices from the chicken. Cook for another 5–7 minutes. You’re looking for an internal temperature of 165°F (74°C). The asparagus should be bright green with tiny charred spots on the tips.

Remove everything from the heat and—this is the most important part—let the chicken rest. Cover it loosely with foil for 5 minutes. This allows the juices to redistribute so they don’t all run out onto your cutting board.

Variations & Substitutions

  • Swap the Protein — This marinade works beautifully on thick-cut pork chops or even salmon fillets. If using salmon, reduce the marinating time to 15 minutes to prevent the acid from “cooking” the fish.
  • Vegetable Swaps — If you aren’t an asparagus fan, try zucchini ribbons or broccolini. Just keep in mind that broccolini takes a few minutes longer to soften.
  • Make it Creamy — To add some healthy fats, top the finished dish with half an avocado or a dollop of Greek yogurt mixed with dill.
  • The Buffalo Twist — Skip the herbs and use hot sauce and melted butter for a spicy, low-carb buffalo chicken vibe. Serve with celery sticks.
Super Juicy Lemon Herb Grilled Chicken & Asparagus

Serving Suggestions

I love serving this straight out of the pan for a rustic feel. If you want a little more “bulk” without the carbs, serve it over a bed of cauliflower rice or sautéed baby spinach. The spinach wilts beautifully under the heat of the chicken. A sprinkle of feta cheese or grated parmesan right at the end adds a salty pop that ties the lemon and garlic together perfectly.

How to Store & Reheat

Store any leftovers in an airtight glass container in the fridge for up to four days. When you’re ready to eat lunch, I recommend reheating the chicken in a pan over medium heat with a tiny splash of water or chicken broth. This creates a “steam room” effect that prevents the meat from becoming rubbery in the microwave. The asparagus is also delicious cold, chopped up into a quick low-carb salad.

FAQ

Can I use chicken thighs instead of breasts?
Absolutely. Boneless, skinless chicken thighs are actually more forgiving because they have a higher fat content. They will stay even juicier, though they might take an extra 2 minutes per side to cook through.

Is this recipe good for keto?
Yes! This is a keto superstar. It is naturally high in protein and healthy fats with almost zero sugar. Just be sure your lemon juice is fresh and not a sweetened bottled version.

What if I don’t have a grill?
No problem. Use a cast-iron skillet or a heavy-bottomed frying pan. You can also bake this at 400°F (200°C) for about 20-25 minutes, though you’ll miss out on that lovely charred flavor.

Can I freeze the marinated chicken?
Yes! I often double the marinade and throw half the chicken into a freezer bag with the liquid. It marinates as it thaws in the fridge overnight. It’s a total lifesaver for busy weeks.

Conclusion

Eating well shouldn’t feel like a chore. This lemon herb chicken proves that you can hit your macro goals and feel fueled without sacrificing the joy of a home-cooked meal. It’s bright, it’s punchy, and it’s exactly what your body is craving. Fire up the stove and give this a shot tonight—your future, energized self will thank you.

low carb, protein meals, easy dinner, keto recipes, healthy chicken, meal prep, gluten free, high protein

📋 Recipe Card

Lemon Herb Grilled Chicken & Asparagus

⏱️ Prep: 15 minutes
🍳 Cook: 15 minutes
👥 Serves: 4
🔥 Calories: 340
⏱️ Total Time: 30 minutes

🥗 Ingredients

  • 4 boneless skinless chicken breasts (approx. 6oz each)
  • 1 large bunch of asparagus, woody ends trimmed
  • 3 tablespoons extra virgin olive oil
  • juice and zest of 1 large lemon
  • 3 cloves garlic, minced
  • 1 tablespoon fresh rosemary, finely chopped
  • 1 tablespoon fresh thyme, chopped
  • 1/2 teaspoon red pepper flakes
  • 1 teaspoon kosher salt
  • 1/2 teaspoon black pepper

📋 Instructions

  1. 1In a large bowl or zip-top bag, whisk together olive oil, lemon zest, lemon juice, garlic, rosemary, thyme, red pepper flakes, salt, and pepper.
  2. 2Add the chicken breasts to the marinade, ensuring they are fully coated. Let marinate for at least 20 minutes (up to 4 hours in the fridge).
  3. 3Preheat your grill or cast-iron skillet to medium-high heat. Lightly oil the grates or pan.
  4. 4Place the chicken on the grill. Cook for 6-7 minutes on the first side without moving it to develop a golden-brown crust.
  5. 5Flip the chicken. Add the asparagus to the grill or pan next to the chicken, drizzling with any leftover marinade if desired.
  6. 6Cook for another 5-7 minutes until the chicken reaches an internal temperature of 165°F and the asparagus is tender-crisp and charred.
  7. 7Remove from heat and let the chicken rest for 5 minutes before slicing. Serve with a final squeeze of fresh lemon.

🍴 Enjoy your meal! 🍴

The Ultimate Guide to Easy Healthy Meal Prep

Learn how to master healthy meal prep with my favorite Mediterranean Quinoa Bowls. Save

Learn how to master healthy meal prep with my favorite Mediterranean Quinoa Bowls. Save time, eat better, and enjoy delicious weekday lunches!

Now, meal prep isn’t about spending six hours in the kitchen or eating the exact same bland chicken and broccoli five days in a row. It’s about setting your future self up for success. It’s the smell of roasted sweet potatoes filling the kitchen and the satisfying “snap” of fresh cucumbers as you chop them into containers. When I open my fridge on a busy Wednesday and see a rainbow of prepped ingredients waiting for me, I feel a genuine sense of peace. This Mediterranean Quinoa Bowl recipe is the one I come back to again and again because it hits every note: it’s crunchy, zesty, filling, and actually gets better after sitting in the fridge for a day or two.

The Key Ingredients

To make a meal prep dish that actually lasts, you need hardy ingredients that won’t turn into a soggy mess by Thursday. We start with a base of Quinoa. I love quinoa because it’s a complete protein and acts like a little sponge for the dressing. If you isn’t a fan, farro or brown rice work beautifully too.

Next, we add a punch of plant-based protein with Chickpeas. I roast half of them for crunch and leave the other half plain for creaminess. For the “rainbow” factor, we use English Cucumbers (they have thinner skins and fewer seeds, so they stay crunchy) and Cherry Tomatoes.

The “flavor bombs” are the Kalamata Olives and Feta Cheese. These provide that salty, briny kick that keeps the bowl from feeling boring. If you’re dairy-free, a scoop of hummus or some pickled red onions adds that same acidic brightness. Finally, my Lemon-Tahini Dressing ties it all together with a silky, nutty finish that is far superior to anything you’ll find in a bottle.

How to Make It Step-by-Step

The secret to efficient meal prep is “active waiting.” While your quinoa is simmering and your veggies are roasting, you should be chopping the fresh components. Start by rinsing your quinoa thoroughly—don’t skip this, or it will taste bitter and soapy! Bring it to a boil with water or vegetable broth, then turn it down to the lowest simmer for about 15 minutes. Once it’s done, move it to a large sheet pan and fluff it with a fork. Spreading it out helps it cool quickly and prevents it from overcooking in the pot.

While the quinoa does its thing, toss your chickpeas and diced sweet potatoes with olive oil, dried oregano, and a pinch of smoked paprika. Roast them at 400°F (200°C) until the potatoes are tender and the chickpeas are slightly golden. This usually takes about 25 minutes. Your kitchen will start to smell like a rustic Greek taverna at this point, which is the best part of the process.

While the oven is working, get to work on the “fresh” pile. Slice your cucumbers into half-moons and halve your tomatoes. I like to keep these in a separate bowl until I’m ready to assemble. For the dressing, whisk together tahini, fresh lemon juice, a clove of grated garlic, and a splash of maple syrup. If the tahini seizes up and gets thick, don’t panic! Just add a teaspoon of warm water at a time until it reaches a pourable, creamy consistency. It’ll go from a paste to a beautiful, velvet-smooth sauce right before your eyes.

Serving Suggestions and Variations

One of the biggest mistakes people make with meal prep is lack of variety. You can serve these bowls cold, straight from the fridge, which is perfect for office lunches. However, if you’re at home, I love warming up just the quinoa and roasted veggies in a skillet for three minutes before topping them with the cold cucumbers and feta. The contrast of temperatures is divine.

If you want to bulk this up even more, a grilled chicken breast or a piece of flaky wild-caught salmon makes an incredible topping. For my vegan friends, add a big dollop of creamy baba ganoush or extra avocado. If you find yourself getting bored by Thursday, try stuffing the ingredients into a whole-wheat pita pocket instead of eating it out of a bowl. Same ingredients, completely different experience! You can also swap the tahini dressing for a spicy harissa oil if you’re craving a bit of heat.

How to Store and Reheat

Storage is where the magic happens. I recommend using glass containers; they keep the food colder and don’t retain odors like plastic can. Layer the quinoa at the bottom, followed by the roasted veggies, then the fresh ones. Keep the dressing in small, separate containers (or those tiny mason jars) and drizzle it on right before you eat. This keeps the veggies from wilting.

These bowls stay fresh and vibrant for up to 4 days in the refrigerator. I don’t recommend freezing this specific recipe because cucumbers and tomatoes lose their structural integrity when thawed, becoming watery. If you do need to reheat, just pop the quinoa and roasted veggie portion into the microwave for 60 seconds, then add your fresh toppings. It’s like a fresh meal every single time.

Frequently Asked Questions

Can I use a different grain for this meal prep?
Absolutely! While quinoa is my go-to for its protein content, this recipe is incredibly forgiving. Farro offers a wonderful chewy texture that holds up even better than quinoa over five days. Couscous is a great “fast” option if you’re short on time, as it only takes five minutes to prep.

How do I keep the avocado from browning?
If you’re adding avocado, do not prep it on Sunday! Wait until the morning you plan to eat it. Slice it fresh and squeeze a little lime juice over it. If you must prep it ahead, keeping the pit in the container and seals it tightly can help, but fresh is always better for avocado.

Is tahini necessary for the dressing?
Tahini provides a creamy, earthy base that is staple in Mediterranean cooking, but if you don’t have it or have a sesame allergy, you can substitute it with Greek yogurt for a zesty crema, or simply use a high-quality extra virgin olive oil and balsamic vinegar.

What are the best containers for meal prepping?
I swear by glass containers with snap-locking lids. They are microwave-safe, dishwasher-safe, and they don’t stain from things like turmeric or tomato sauce. Plus, seeing the beautiful layers of food through the glass makes you much more likely to actually eat your lunch!

Conclusion

Embracing healthy meal prep isn’t about perfection; it’s about giving yourself the gift of time and nourishment during your busiest days. Once you get into the flow of roasting, chopping, and whisking, you’ll find it’s actually a quite meditative way to spend a Sunday afternoon. I hope these Mediterranean Quinoa Bowls become a staple in your household just as they have in mine. Give it a try this weekend, and I promise your Monday-self will be thanking you with every delicious, crunchy bite!

📋 Recipe Card

Mediterranean Meal Prep Quinoa Bowls

⏱️ Prep: 20 minutes
🍳 Cook: 25 minutes
👥 Serves: 4
🔥 Calories: 410 kcal
⏱️ Total Time: 45 minutes

🥗 Ingredients

  • 1 cup dry quinoa, rinsed
  • 2 cups water or vegetable broth
  • 1 can (15 oz) chickpeas, drained and rinsed
  • 1 large sweet potato, peeled and cubed
  • 2 tablespoons olive oil
  • 1 teaspoon dried oregano
  • 1/2 teaspoon smoked paprika
  • 1 cup cherry tomatoes, halved
  • 1 English cucumber, diced
  • 1/2 cup crumbled feta cheese
  • 1/4 cup tahini
  • 1 tablespoon fresh lemon juice
  • 1 clove garlic, minced
  • 1 teaspoon maple syrup
  • Salt and pepper to taste

📋 Instructions

  1. 1Preheat your oven to 400°F (200°C). Tossing the cubed sweet potatoes and chickpeas with olive oil, oregano, paprika, salt, and pepper on a large baking sheet.
  2. 2Roast the vegetables for 25 minutes, tossing halfway through, until the potatoes are tender and chickpeas are slightly crisp.
  3. 3While roasting, bring quinoa and water/broth to a boil in a medium pot. Reduce heat to low, cover, and simmer for 15 minutes. Remove from heat and let sit for 5 minutes before fluffing with a fork.
  4. 4In a small bowl, whisk together the tahini, lemon juice, minced garlic, and maple syrup. Add 1-2 tablespoons of warm water until it reaches your desired drizzling consistency.
  5. 5To assemble for meal prep, divide the quinoa between four glass containers. Top with the roasted sweet potato and chickpea mix, followed by raw cucumbers, tomatoes, and feta cheese.
  6. 6Store the dressing in four separate small dressing containers. Seal lids tightly and refrigerate for up to 4 days.

🍴 Enjoy your meal! 🍴

The Ultimate Guide to Easy Mediterranean Bowl Meal Prep

I’ll be the first to admit that my relationship with meal prepping hasn’t always

I’ll be the first to admit that my relationship with meal prepping hasn’t always been a smooth one. For years, I associated the phrase “meal prep” with those sad, monochromatic containers of dry chicken breast and limp broccoli. I’d spend my entire Sunday afternoon over a hot stove, only to end up with five lunch containers that I dreaded opening by the time Wednesday rolled around. It felt like a chore rather than a way to nourish myself, and honestly, it took the joy out of cooking.

That all changed when I shifted my focus to the Mediterranean diet—not as a strict set of rules, but as a philosophy of eating that prioritizes vibrant colors, punchy acids, and healthy fats. These Mediterranean Meal Prep Bowls are the result of that shift. Every time I open my fridge on a Tuesday afternoon and see these neatly stacked jars or containers, I feel a sense of relief. There is something deeply grounding about knowing you’ve already taken care of your future self.

These bowls aren’t just “fuel”; they are a celebration of textures. You have the crunch of fresh cucumbers, the creamy saltiness of feta cheese, the bright zing of a lemon-tahini dressing, and the satisfying heartiness of herb-flecked quinoa. It’s a meal that tastes just as good on day four as it does on day one—perhaps even better, as the flavors have a chance to really get to know each other. Whether you’re a busy parent, a student, or just someone trying to break the cycle of expensive takeout lunches, this recipe is designed to bring a little bit of sunshine into your workday.

Key Ingredients

What makes this specific meal prep so successful is the balance of “pantry staples” and fresh produce. For the base, I love using quinoa. It’s a complete protein, which keeps you fuller for longer than white rice, and it has a slightly nutty flavor that works beautifully with cold toppings. If you aren’t a fan of quinoa, farro or brown rice are excellent hearty substitutes.

For the protein, canned chickpeas are my secret weapon. They are inexpensive, require zero cooking (unless you want to roast them for a little extra crunch), and soak up vinaigrettes like a sponge. If you need a meat-based protein, some grilled chicken breast seasoned with oregano and garlic fits perfectly here.

The “crunch factor” comes from English cucumbers and cherry tomatoes. I prefer English cucumbers because the skin is thinner and the seeds are smaller, meaning they won’t release as much water and make your bowl soggy by Thursday. Kalamata olives and pickled red onions provide that essential brine and acidity that cuts through the richness of the feta cheese. Finally, a generous handful of fresh parsley is non-negotiable—it adds an aromatic freshness that makes the whole dish feel “alive” rather than just a leftovers container.

How to Make It

Success in meal prepping is all about the workflow. I like to start by getting the quinoa on the stove first. Rinse your quinoa thoroughly under cold water—this removes the saponin, which can make it taste bitter. Combine it with water or vegetable broth (broth adds so much more flavor!) and bring it to a boil. Once it hits that boil, lower the heat, cover it, and let it simmer for about 15 minutes. The key tip here? Once the water is absorbed, turn off the heat but keep the lid on for an extra 5 minutes. This creates the fluffiest texture.

While the quinoa is doing its thing, move on to the vegetable “assembly line.” I find it therapeutic to chop everything into uniform, bite-sized pieces. Halve your cherry tomatoes and dice your cucumbers and red bell peppers. If you are making your own pickled red onions (which I highly recommend), simply thinly slice a red onion and submerge it in a mixture of apple cider vinegar, a pinch of salt, and a dash of honey. They only need about 20 minutes to turn that beautiful vibrant pink.

The dressing is where the magic happens. In a small jar, whisk together extra virgin olive oil, fresh lemon juice, a clove of minced garlic, dried oregano, and a spoonful of tahini if you like a creamier finish.

When it comes to assembly, if you are using glass jars, always put the dressing at the very bottom. Follow with the chickpeas, then the quinoa, then the hard vegetables like peppers and cucumbers. Place the feta, olives, and fresh herbs at the very top. This “stacking” method keeps the delicate ingredients away from the liquid, ensuring nothing gets mushy before you’re ready to eat. If you’re using flat containers, I recommend keeping the dressing in a separate small condiment cup. Timing-wise, you can have four days of lunch ready in exactly 30 minutes if you move efficiently!

Serving Suggestions

While these bowls are a complete meal on their own, there are plenty of ways to jazz them up right before you eat. My favorite way to serve these is with a big dollop of hummus or tzatziki on the side. The creaminess of the yogurt-based tzatziki acts as a secondary sauce that marries all the ingredients together.

If you happen to be at home when you’re eating one of these, try warming up a piece of whole-wheat pita bread or some naan. You can use the bread to scoop up the salad, making it feel more like a Mediterranean feast. For those who want a bit of heat, a drizzle of Sriracha or a sprinkle of red pepper flakes works wonders. If you have any leftover avocado, slice half of one and add it to the bowl just before serving—the healthy fats make the meal feel incredibly indulgent. This also pairs beautifully with a simple side of fresh fruit or a handful of almonds if you need an extra afternoon energy boost.

How to Store

The beauty of this recipe lies in its longevity. These bowls will stay perfectly fresh in the refrigerator for up to 4 to 5 days. I highly recommend using airtight glass containers (like Mason jars or Pyrex) because they keep the produce crispier than plastic does and they don’t retain odors.

When you’re ready to eat, if you’ve used the “jar method,” simply shake the jar vigorously or dump the contents into a large bowl and toss. This ensures the dressing from the bottom coats every single piece of quinoa and vegetable. These bowls are intended to be eaten cold or at room temperature, so there’s no need to worry about finding a microwave at the office—which, let’s be honest, is half the battle of a successful packed lunch! I do not recommend freezing this specific recipe, as the fresh cucumbers and tomatoes will lose their texture entirely once thawed.

FAQ Section

Can I use a different grain instead of quinoa?
Absolutely! This is a very “forgiving” recipe. Couscous is a fantastic alternative that takes only five minutes to prepare. For a gluten-free option with more chew, try brown rice or even cauliflower rice if you’re looking to lower the carbohydrate content.

How do I prevent the salad from getting soggy?
The secret is in the layering. Always keep your “wet” ingredients (like dressing and tomatoes) separate or at the bottom of the container. Adding the salt only right before eating also helps, as salt draws moisture out of vegetables like cucumbers.

Can I add meat to this meal prep?
Yes! Grilled chicken, sliced turkey, or even canned tuna work exceptionally well with these Mediterranean flavors. If adding tuna, I suggest adding it the morning of to keep it as fresh as possible.

Is this recipe vegan-friendly?
It is almost there! To make this 100% vegan, simply omit the feta cheese. You can replace the salty “hit” of the feta with extra Kalamata olives or even some nutritional yeast sprinkled over the top.

Conclusion

There is a certain kind of peace that comes with having your meals sorted for the week. It frees up your mental energy to focus on the things that actually matter, rather than stressing over what’s for lunch at 11:30 AM every day. These Mediterranean Meal Prep Bowls aren’t just about nutrition; they’re about reclaiming your time and enjoying every bite of the process. I hope these become a staple in your kitchen just as they have in mine. Give them a try this Sunday—your Wednesday self will thank you!

Vibrant Mediterranean Meal Prep Bowls

Prep: 15 minutes
Cook: 15 minutes
Total: 30 minutes
Servings: 4
Calories: 385 kcal

Ingredients

  • 1 cup dry quinoa, rinsed
  • 2 cups vegetable broth or water
  • 1 can (15 oz) chickpeas, drained and rinsed
  • 2 cups cherry tomatoes, halved
  • 1 large English cucumber, diced
  • 1 red bell pepper, chopped
  • 1/2 cup Kalamata olives, pitted
  • 1/2 cup red onion, thinly sliced (or pickled)
  • 1/2 cup crumbled feta cheese
  • 1/4 cup fresh parsley, chopped
  • For the dressing: 1/4 cup olive oil, 2 tbsp lemon juice, 1 clove garlic minced, 1 tsp dried oregano, salt and pepper to taste

Instructions

  1. In a medium saucepan, combine rinsed quinoa and vegetable broth. Bring to a boil, then reduce heat to low, cover, and simmer for 15 minutes.
  2. Remove quinoa from heat and let it sit covered for 5 minutes. Fluff with a fork and let it cool slightly.
  3. While quinoa cooks, whisk together all dressing ingredients in a small bowl or jar.
  4. Prep your vegetables: dice the cucumber, halve the tomatoes, and chop the peppers and parsley.
  5. For assembly using jars: Pour 2 tablespoons of dressing into the bottom of 4 large glass jars.
  6. Layer the ingredients in this order: chickpeas, cooked quinoa, bell peppers, cucumbers, tomatoes, red labels, olives, and finally the feta cheese and parsley.
  7. Seal the containers and store in the refrigerator for up to 5 days. Shake or toss before serving.
Why Cardio Isn’t Working for Postpartum Weight Loss

Why Cardio Isn’t Working for Postpartum Weight Loss (And What to Do Instead)

Struggling with postpartum weight loss? Discover why cardio isn't the answer and learn effective

I thought losing postpartum weight was simple. Just add more cardio and wait for the scale to drop. But I was wrong. Cardio sometimes made me feel more tired, more sore, and less like myself.

Still, I believe exercising after pregnancy is a great gift for my body and mind. The Mayo Clinic says postnatal exercise helps with weight loss if you also eat less. It boosts energy, improves sleep, eases stress, and can lessen symptoms of postpartum depression.

But I’m not against cardio. I’m for using the right tool at the right time, especially during postpartum recovery. My missing piece was fixing my pelvic floor and strengthening my core for impact.

I also made some basic rules. The Mayo Clinic and the U.S. Department of Health and Human Services stress to start slow. Warm up, cool down, gradually increase the pace, drink plenty of fluids, and stop if it hurts. I follow these steps for postpartum fitness, even on days when I feel energetic.

Bodies are different and don’t follow a single path. HealthPartners shows that recovery can differ after vaginal births or C-sections, affecting safe workouts. So, I’m first focusing on strength training after giving birth. Then I’ll add walking, short movements, and realistic nutrition.

Why Cardio Isn’t Working for Postpartum Weight Loss

I thought sweating more and working harder was the answer. Yet, postpartum weight loss was different this time. Trying to beat it with more cardio made me feel weak, not strong.

After having a baby, my core felt weak, like a deflated balloon. Cardio involves many quick changes in pressure which didn’t help.

My core and pelvic floor aren’t a “stable platform” yet (and cardio asks them to be)

For core stability postpartum, I need my deep core muscles working well together. This includes the diaphragm, transverse abdominals, and others. They help me move powerfully when in sync.

Without this coordination, I felt out of control. Even if my pelvic floor was healing, it couldn’t keep up during cardio. My form would quickly break down.

Cardio is great for heart health and stress relief, but it doesn’t rebuild the foundation pregnancy changed

Cardio boosts my mood and helps with fitness and stress. However, it doesn’t fix the muscles stretched during pregnancy.

Running or cycling improves breathing and endurance but not muscle growth. Resistance training helps rebuild strength. Skipping it for quick cardio means I’m missing crucial stability.

Training style Primary stimulus What it can do well for me postpartum What it won’t fix by itself
Steady-state cardio (running, cycling) Cellular systems tied to respiratory capacity; muscular endurance Supports heart health, stress relief, and daily stamina Doesn’t retrain coordination of the deep core system or restore pelvic support
Resistance training (weights, bands) Protein synthesis linked to hypertrophy; maximum strength Rebuilds strength and control so movement feels steady again Doesn’t replace gentle re-connection work if breathing and pressure control are off

When I push intensity too soon, I risk the “speedbumps” I don’t want (leaking, pain, pressure, doming)

Ramping up HIIT too soon brought problems. I noticed leaking, pelvic and back pain, and feeling heavy. Effort spikes even caused my belly to dome.

This warned me about risks like prolapse and joint issues. Pain or fatigue meant I needed to stop and not push through.

Instead of just wanting to sweat it out, I realized I needed a solid foundation. Rebuilding core stability made intense workouts a choice, not a struggle.

What postpartum weight loss really looks like (and why my expectations needed a reset)

I thought I’d lose weight quickly with extra cardio. But I learned that understanding the postpartum weight loss timeline and aligning my plan with recovery helped more.

Knowing what my body was going through, I stopped seeing slow weeks as failures. I began to aim for steady, realistic progress instead.

What usually drops right away after delivery

When I wondered about the weight loss right after birth, I found a specific answer. Most women lose around 10–13 pounds from the baby, the placenta, and amniotic fluid.

Then there’s the shift in the first week that’s not really “fat loss.” When my swelling went down, I noticed the retained fluids postpartum started to leave. This made the scale drop fast, even without changing my routine.

Why “rapid” weight loss isn’t typical postpartum

I had to learn that quick weight loss isn’t common while the body is healing. It might take up to a year to get back to pre-pregnancy weight for some, which is normal.

My aim shifted to slow and steady progress. Trying for 1–2 pounds a week postpartum is advised. Pushing too hard can lead to problems, especially when you’re not sleeping much and stress is high.

Time window What the scale often reflects What I focus on instead
Right after birth 10–13 pounds after delivery from pregnancy tissue and fluid Rest, gentle walking, and letting my core settle
First week Shifts from retained fluids postpartum as swelling eases Protein, regular meals, and short movement breaks
Weeks to months Slower change as fat loss competes with recovery and sleep A sustainable pace of 1–2 pounds per week postpartum, if weight loss is a goal

Breastfeeding calories: real, but not a free pass

Breastfeeding is helpful, but it’s not a magic solution. Despite hearing breastfeeding burns 500 calories, cutting too much food made my energy and mood plummet.

The best approach for me is moderate, consistent exercises while breastfeeding. I watch my milk supply and stay hydrated because dehydration can worsen how I feel and complicate feeding.

When I do intense workouts, I plan them carefully. I’ll feed or pump before or wait a while after if taste affects feeding.

Starting to exercise after birth, I keep things simple. I might go for walks a few days after an uncomplicated vaginal delivery. But after a C-section, I wait until my doctor says it’s okay to avoid straining my abdomen.

What I do instead of more cardio: strength training for postpartum recovery and fat loss

I don’t just add more cardio for postpartum weight loss. I focus on strength training. It helps fix changes from pregnancy and increases my stamina.

I take real recovery seriously from the start. For the first two weeks after giving birth, I rest a lot. I only take short walks if they feel good to me. Later, about six weeks in and with advice from my doctor, I begin simple strength exercises I can control.

postpartum strength training

Why I prioritize resistance training first

Resistance training helps me reconnect with my core after giving birth. It teaches me control and alignment without overdoing it.

It also improves my posture and strengthens me for everyday tasks. It lowers my injury risk, too. It benefits me differently than just running would.

When I train, I watch out for leaks, pain, strange pressure, and bulging muscles. If I notice any, I take it easy and might get help from specialists.

The early moves I lean on to rebuild my foundation

I see core and pelvic floor work as practice, not a tough workout. I start with deep breathing exercises lying down, doing this several times a day.

Next, I use Connection Breath to sync my body parts on purpose. It helps me balance tension and relaxation.

To work on pelvic tilts, I lie down and adjust my pelvis with my muscles, then hold. I start with a few reps and increase them as I get smoother.

Doing Kegels correctly is key for me postpartum. I practice them carefully, not rushing, and adjust the routine based on how I feel each day.

On days I feel stiff, I turn to gentle yoga. Happy Baby Pose helps me relax and refocus.

With my doctor’s okay, I add more moves like bridges and bird dogs. I’m careful to avoid anything that strains my middle section.

Foundation focus What I do My form cue How I dose it early
Breath + pressure control Deep breathing + Connection Breath Ribs expand on inhale; long exhale without gripping my neck 5–10 minutes, 2–3 times per day
Core control pelvic tilts postpartum Low back gently presses down; no butt clench Hold up to 10 seconds; 5 reps, build to 10–20
Pelvic floor strength Kegels postpartum Lift and release fully; no breath holding 3 sets/day: either 10x (10-sec hold/10-sec rest) or 10–15x (3-sec/3-sec)
Mobility + calming gentle yoga postpartum (Happy Baby Pose) Jaw and belly soft; breathe into the stretch Hold about 90 seconds

How I progress toward “real workouts” without rushing

When I feel ready, I start with bodyweight and bands. I focus on doing more reps and sets first. Then, I slowly increase the weight.

I work on strengthening my back, glutes, and legs. I also stretch my chest and hips. This improves my posture and makes daily tasks easier.

I practice movements I do every day, like squats and lifting. I wear a comfy sports bra and use nursing pads if needed.

How I combine safe cardio, daily movement, and nutrition so weight loss actually happens

Once I get the ok from my doctor, I think of cardio as an important part but not the only focus. I aim for 150 minutes of medium-level aerobic exercise each week after having a baby. This goal is split throughout the week to make it manageable even with a little one around. I keep my exercise moderate on purpose because doing too much isn’t always the best approach.

Starting with a simple post-baby walking plan helps me fit exercise into my busy life. Some days I might do a long walk with the stroller, and other days I do three short walks that add up. Breaking it into three 10-minute walks makes it easier for me to manage my energy and stick with it.

When I feel strong enough, I start doing activities that are easy on my body. I wait to start swimming until after my post-baby bleeding stops, and I make sure the first few times in the pool are easy and fun. I find water aerobics really good because it’s gentle on my body but still gets my heart rate up.

To make sure I keep getting better, I increase my exercise time or distance by just 10% each week. This approach helps even when I want to do more. I also make sure to warm up, cool down, drink plenty of water, and stop if something hurts.

Sometimes my body sends signals that I need to take it easier. If I feel pressure in my pelvis, leak, have sharp pains, get really tired, or see my belly bulge oddly, I know it’s time to slow down. I’d rather have small successes regularly than miss out because I overdid it and got hurt or too tired.

What I do How I keep it safe and realistic What I watch for
Daily walk Use my postpartum walking plan with 10-minute blocks; add steps during errands or around the house Pelvic pressure, leaking, heavy legs, or pain that changes my stride
Weekly cardio goal Aim for 150 minutes moderate aerobic activity postpartum across 4–6 days; keep most sessions easy to moderate Excessive fatigue later that day, poor sleep, or soreness that lingers
Pool workouts Start with swimming after postpartum bleeding ends; try water aerobics postpartum for low-impact cardio New discomfort, increased bleeding, or feeling wiped out after a short session
Progression Follow the 10% rule postpartum for distance or time; add only one “bigger” change per week Any return of core doming, pelvic heaviness, or pain during the increase

Eating right helps me see the results of my efforts. I eat plenty of protein and fiber at meals, like eggs and fruit or beans with rice and veggies. Protein keeps me full and supports recovery, while fiber helps prevent constipation after having a baby.

I try to eat fewer processed foods because they’re easy to have too much of when I’m tired. I also eat fewer refined carbs by choosing whole grains instead. When craving sweets, I pick options with fruit, nuts, whole grains, or a little dark chocolate.

Drinking enough water is essential for me, especially when breastfeeding. It keeps me feeling good and helps with my workouts. I try to drink five to eight extra glasses of water or other non-caffeinated drinks daily. To make sure I don’t forget, I leave a water bottle where I nurse my baby, especially on busy days.

To maintain my routine, I don’t skip meals and try to eat at the same times every day. I use meal kits, pre-cut veggies, and precooked chicken to make things easier. If someone offers to help, I ask for groceries or prepared meals. This support helps me keep everything on track.

Conclusion

I don’t just say no to cardio. It’s just not my main choice for losing weight after having a baby, especially when I need to fix my core. A smart plan to lose weight after baby involves fixing my core and pelvic floor first. This makes everything else feel safer and more manageable.

I start with simple steps: breathing right, controlling my core, and strengthening my pelvic floor. Then, I move on to lifting weights gradually. This helps me become stable and strong before I dive into cardio. I pick mild cardio activities like fast-paced walking, light biking, or short runs. My goal is to be fit for cardio, not use it to get fit.

Going too hard too soon can lead to issues like leaking, pain, pressure, and bulging muscles. I also want to avoid injuries and other setbacks that might keep me from working out. A good fitness plan after having a baby helps me keep exercising without getting hurt. That’s way better than pushing too hard for just a week.

Keeping expectations real is key. Right after giving birth, many people lose about 10–13 pounds and extra fluid in the first week. Then, losing weight usually takes time, even up to a year. So, I try not to lose more than 1–2 pounds each week. Choosing consistent, gentle workouts, staying hydrated, and following doctors’ advice works best. This approach also brings benefits the Mayo Clinic talks about, like sleeping better, feeling less stressed, having more energy, and improving heart health.